WebService学习笔记-使用CXF发布Webservice
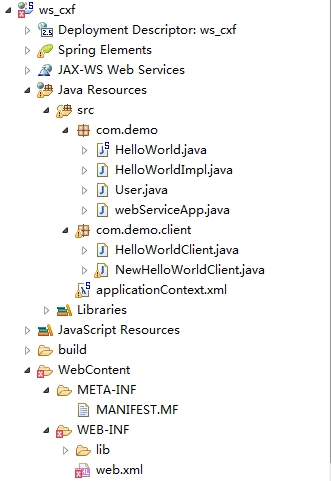
WeB项目结构如图
User.java实体类
public class User {
	private String username;
	private String description;
	//...
}
HelloWorld.java接口
@WebService
public interface HelloWorld {
	String sayHi(@WebParam(name="text")String text);
    String sayHiToUser(User user);
    String[] SayHiToUserList(List<User> userList);
}
HelloWorldImpl.java实现HelloWorld接口
@WebService(endpointInterface = "com.demo.HelloWorld", serviceName = "HelloWorld")
public class HelloWorldImpl implements HelloWorld {

	Map<Integer, User> users = new LinkedHashMap<Integer, User>();

	@Override
	public String sayHi(String text) {
		return "Hello " + text;
	}

	@Override
	public String sayHiToUser(User user) {
		users.put(users.size() + 1, user);
		return "Hello " + user.getUsername();
	}

	@Override
	public String[] SayHiToUserList(List<User> userList) {
		String[] result = new String[userList.size()];
        int i=0;
        for(User u:userList){
             result[i] = "Hello " + u.getUsername();
             i++;
        }
        return result;
	}
}
webServiceApp.java服务端
public class webServiceApp {
	public static void main(String[] args) {
		 System.out.println("Starting web service... ");
         HelloWorldImpl implementor= new HelloWorldImpl();
         String address="http://localhost:8080/helloWorld";
         Endpoint.publish(address, implementor);
         System.out.println("Web service started");
	}
}
HelloWorldClient.java客户端
public class HelloWorldClient {
	//需要先启动com.demo.webServiceApp
	public static void main(String[] args) {
		JaxWsProxyFactoryBean svr = new JaxWsProxyFactoryBean();
        svr.setServiceClass(HelloWorld.class);
        svr.setAddress("http://localhost:8080/helloWorld");
        HelloWorld hw = (HelloWorld) svr.create();
        User user = new User();
        user.setUsername("Umgsai");
        user.setDescription("test");
        System.out.println(hw.sayHiToUser(user));
        String sayHi = hw.sayHi("test~~~");
        System.out.println(sayHi);
	}
}
启动服务端程序后,即可在客户端中调用发布的服务。
可以在浏览器中通过 http://localhost:8080/helloWorld?wsdl 来查看发布的服务
将服务集成到Spring中
applicationContext.xml
<?xml version="1.0" encoding="UTF-8"?>
<beans xmlns="http://www.springframework.org/schema/beans"
	xmlns:xsi="http://www.w3.org/2001/XMLSchema-instance" xmlns:jaxws="http://cxf.apache.org/jaxws"
	xsi:schemaLocation="
	http://www.springframework.org/schema/beans
	http://www.springframework.org/schema/beans/spring-beans.xsd
	http://cxf.apache.org/jaxws
	http://cxf.apache.org/schemas/jaxws.xsd">

	<import resource="classpath:META-INF/cxf/cxf.xml" />
	<import resource="classpath:META-INF/cxf/cxf-extension-soap.xml" />
	<import resource="classpath:META-INF/cxf/cxf-servlet.xml" />

	<jaxws:endpoint id="helloWorld" implementor="com.demo.HelloWorldImpl"
		address="/helloWorld" />

	<bean id="client" class="com.demo.HelloWorld" factory-bean="clientFactory"
		factory-method="create" />

	<bean id="clientFactory" class="org.apache.cxf.jaxws.JaxWsProxyFactoryBean">
		<property name="serviceClass" value="com.demo.HelloWorld" />
		<property name="address"
			value="http://localhost:8080/ws_cxf/webservice/helloWorld" />
	</bean>
</beans>
web.xml
<?xml version="1.0" encoding="UTF-8"?>
<web-app xmlns:xsi="http://www.w3.org/2001/XMLSchema-instance" xmlns="http://java.sun.com/xml/ns/javaee" xsi:schemaLocation="http://java.sun.com/xml/ns/javaee http://java.sun.com/xml/ns/javaee/web-app_2_5.xsd" id="WebApp_ID" version="2.5">
  <display-name>ws_cxf</display-name>
  <welcome-file-list>
    <welcome-file>default.jsp</welcome-file>
  </welcome-file-list>

	<context-param>
		<param-name>contextConfigLocation</param-name>
		<param-value>WEB-INF/classes/applicationContext.xml</param-value>
	</context-param>

	<listener>
		<listener-class>
			org.springframework.web.context.ContextLoaderListener
		</listener-class>
	</listener>
	<servlet>
		<servlet-name>CXFServlet</servlet-name>
		<display-name>CXFServlet</display-name>
		<servlet-class>
                 org.apache.cxf.transport.servlet.CXFServlet
		</servlet-class>
		<load-on-startup>1</load-on-startup>
	</servlet>

 	<servlet-mapping>
		<servlet-name>CXFServlet</servlet-name>
		<url-pattern>/webservice/*</url-pattern>
	</servlet-mapping>
</web-app>
将项目部署在Tomcat上并启动,可以通过http://192.168.13.232:8080/ws_cxf/webservice/helloWorld?wsdl 来查看
此时客户端代码如下
public class NewHelloWorldClient {
	//需要先将项目运行在Tomcat上
	public static void main(String[] args) {
		ApplicationContext applicationContext = new ClassPathXmlApplicationContext("applicationContext.xml");
		HelloWorld client = (HelloWorld) applicationContext.getBean("client");
		User user1 = new User();
        user1.setUsername("Tony");
        user1.setDescription("test");
        User user2 = new User();
        user2.setUsername("freeman");
        user2.setDescription("test");
        List<User> userList= new ArrayList<User>();
        userList.add(user1);
        userList.add(user2);
        String[] sayHiToUserList = client.SayHiToUserList(userList);
        System.out.println(sayHiToUserList[0]);
	}
}
可以使用CXF的wadl2java 工具来根据url生成客户端代码
apache-cxf-3.0.1\bin wadl2java  http://192.168.13.232:8080/ws_cxf/webservice/helloWorld?wsdl
参考 http://www.cnblogs.com/frankliiu-java/articles/1641949.html
出现ClassNotFound的异常时可以到 findjar.com 搜索
源码 http://yunpan.cn/cgGzyjBdYGJDF (提取码:51c5)
本文出自 “阿凡达” 博客,请务必保留此出处http://shamrock.blog.51cto.com/2079212/1562522
郑重声明:本站内容如果来自互联网及其他传播媒体,其版权均属原媒体及文章作者所有。转载目的在于传递更多信息及用于网络分享,并不代表本站赞同其观点和对其真实性负责,也不构成任何其他建议。


