THE most basic way to implement ASP.NET Razor security


If you look at the ASP.NET Web Pages (aka Razor) tutorials on the ASP.NET web site, there‘s a chapter devoted to adding security to a site in the form of membership (that is, a login capability). This chapter basically recommends that you use the Starter Site template, which already includes membership pages. It then shows you a few ways to extend the existing membership facilities, which it does by, effectively, re-implementing manually some of the pages created by the template.

But what if you want to add membership/login to an existing site? Razor lets you pretty easily build login capabilities into any site. However, it‘s not necessarily obvious how to do it. What I want to show you here is an absolutely bare-bones way to add login to your site, and how do it all manually and from scratch. The emphasis really is going to be on using the APIs -- which are simple -- to implement security.

I‘ll really try to keep it as straightforward as possible. However, because I think there‘s such a thing as too simple, I‘ll give you a three-pronged set of techniques:

  • The absolute minimum thing you must do.
  • The things that are "nice to do" or maybe even that you almost probably have to do (like ask for a password twice). I‘ll go ahead and do these, but point them out.
  • Things you would (must) do in a real production application (like use SSL to protect password pages). I won‘t show you those here, or at least, not today.

A little background


ASP.NET Razor has an infrastructure for security/login that automates a lot of the process. For starters, membership information (user names, passwords, like that) are stored in a database in your site. Razor includes a membership provider, which is a component that handles the details of managing this database. In effect, if you don‘t want to, you never need to think about how or where the login information is being handled. For purposes of this little tutorial, the assumption will be that you‘ll just be happy with whatever it‘s doing under the hood. (More on that in a moment.)

Razor also includes the WebSecurity helper and the Membership and Roles objects, which between them include the methods that you need in order manage membership. There‘s a create-user method, a login method, a logout method, stuff like that. This tutorial basically consists of exercising some of the basic capabilities. (You will not be surprised to hear that there are a lot more than you‘ll see here.)

What you need to do


Ok, here‘s what I‘ll show how to do:

  • Initialize the membership system. [Link]
  • Create a home page, which will be the site‘s public content. [Link]
  • Create a registration page where people can sign up. [Link]
  • Create a login page. [Link]
  • Create a logout page. [Link] (You don‘t necessarily have to send them to a separate page, but that‘s the easiest.)
  • Create some content that should be viewable only to people who are logged in. [Link]
  • Provide a way to manage roles (create/delete them, add/delete users in roles). [Link]
  • Protect content by role, i.e., make content available only to users who are in a specific role (e.g., "administrator"). [Link]

The site layout will look like this:

技术分享


You can see this in action, sort of, on a site that implements this stuff. Start on the home page and then follow along with the pages listed below.

If you‘ve seen the existing security tutorial, these tasks will be familiar. In fact, if you‘ve seenany ASP.NET membership tutorial, they‘ll be familiar, because those are essentially the things you do with membership. The difference here is that I will, as noted, attempt to get this up and running in the sparsest way possible.

Initialize the membership system


Before you use the membership system, it has to be initialized. Technically you can do this any time, as long as you do it before you start interacting with membership system. In practice, you want to do this as soon as the application starts up, which means you do it in the site‘s _AppStart.cshtml file.

The code for the _AppStart.cshtml page here.

Must do
    • In the root of the site, create a file named _AppStart.cshtml. This runs when the site first spins up.

Details later about these values below. Hint: You don‘t need to worry about them.
Do in real app
  • Point to your existing users table.

Initialization values


"TestMembership" The name of the database to store membership info. This can be any name. ASP.NET will create this database if it doesn‘t exist.UpdateThis is the name of an existing database where ASP.NET should store membership information. The database must exist; the initialization method will create the appropriate tables if they don‘t already exist. Anyway, with this code in place, when the site starts up, the database and membership tables are just there, ready to go.
"UserProfile" The name of the table where user info is stored. See below.
"UserId" The name of the primary-key column for user info in the user-profile table. (Also see below.)
"Email" The name of the column that holds the user name (presumed to be an email address) for the user in the user-profile table.

Given the circumstances here (simplest possible membership), it doesn‘t matter what you pass for these values. Use the site name for the database name and just copy the rest of the values as they are here.

What these values are for


As an aside, some details about the membership database. If you don‘t care, skip this section, it isn‘t essential. So if the membership system is so danged automated, why do you need to pass all these values to the initialization method? We don‘t need to for now. However, the membership system is designed so it can integrate with any existing database you might have that already has user information in it. If you already have a contacts list or an employee table, etc., this initialization code lets you point to that database and to the table and columns that contain user ID and name (email) information, and the membership system will use those.

That‘s half the story. The membership system actually makes a distinction between "profile" data and "membership" data. The profile data is the user name and ID, plus whatever else you have for your users (address, etc.). In contrast, the membership data is the detailed security stuff that the membership system needs, like password hash, last password change date, etc. This is information that‘s not only unlikely to be in the profile database table, but that you probably don‘t even want to keep there. Anyway, this split between profile data and membership data makes it easier for ASP.NET to use your existing user database. 

Here‘s a screenshot of the membership database structure. The UserProfile table is where the profile data lives; webpages_Membership is the membership data. (The other two tables pertain to roles, which you‘ll implement shortly.) If you were using a user table that you already had, you wouldn‘t need to have the UserProfile table you see here.


技术分享


As noted, during initialization the membership system creates and/or opens the database. The last thing it does is establish a database-type relationship between the profile table and the membership table. Then it‘s ready to go.

Create a home page

技术分享 技术分享

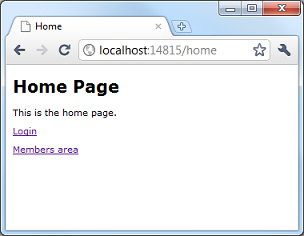
The code for the Home.cshtml page is here.

Must do
  • Create Home.cshtml in the website root.
  • Add a link to the Login page.
Nice to do
    • Add a link to the Register page.

    • For testing purposes, add a link to a page in the Members area. (See below.)

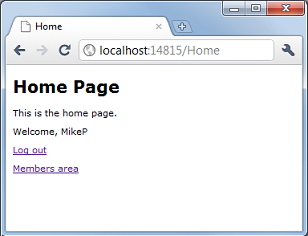
  • In the page, call WebSecurity.IsAuthenticated to see if the user is already logged in. If true, display their current user name (WebSecurity.CurrentUserName) and a link to the Logout page; otherwise, display a link to the Login page:
    @if(WebSecurity.IsAuthenticated)
    {
    <p>Welcome, @WebSecurity.CurrentUserName</p>
    <p><a href="@Href("~/logout")">Log out</a></p>
    }
    else
    {
    <p><a href="@Href("~/Login")">Log in</a> |
    <a href="@Href("~/Register")">Register</a></p>
    }

    Update 10 Feb 2011 Made a small code correction in the preceding example (h/t Dmitry Robsman).

Do in real app
  • Use layout pages and other ways to display the Login link and the current name in reusable chunks. (This applies to all the pages in this example.)

Create a registration page


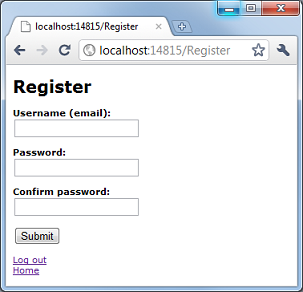
A simple registration page has a place for user name (can be email) and password. Typically you make users enter the password twice, since they can‘t see what they‘re typing. 
技术分享

The code for the Register.cshtml page is here.

Must do
    • Create Register.cshtml in the website root.

    • Add text boxes (<input> elements) for the user name and password (2x), plus a submit button.

    • On postback, check WebSecurity.UserExists to make sure that the user name isn‘t already in use. If not ...

  • Call WebSecurity.CreateUserAndAccount to actually create the membership entry.
    if(WebSecurity.UserExists(username))
    {
    errorMessage = String.Format("User ‘{0}‘ already exists.",
    username);
    }
    else
    {
    WebSecurity.CreateUserAndAccount(username, password,
    null, false);
    WebSecurity.Login(username, password, true);
    errorMessage = String.Format("{0} created.", username);
    }
Nice to do
    • Compare password entries and make sure they‘re the same.

    • On submit, call WebSecurity.Logout to force a logout in case they‘re still logged in.

    • On submit, WebSecurity.IsAuthenticated first to see if 
      they‘re already logged in; if so, display error and skip registration:
      if(WebSecurity.IsAuthenticated)
      {
      errorMessage = String.Format("You are already logged in." +
      " (User name: {0})", WebSecurity.CurrentUserName);
      }

    • After creating the membership user, call WebSecurity.Login to automatically log them in.

    • Redisplay the user‘s entry in the user name text box (useful if there was an error so that they can see what they entered). Due to HTML constraints, you can‘t do this with passwords, even if you wanted to.
Do in real app
    • Add a ReCaptcha test to make sure it‘s a human actually registering. See "Preventing Automated Programs from Joining Your Website" in theAdding Security and Membership tutorial.

    • Create a membership user but don‘t activate it yet. CallMembership.GeneratePasswordResetToken to generate a token and send it in email. Users can follow that link to activate. This requires that your website be configured to be able to send emails. For details, see "Letting Users Generate a New Password" in the Adding Security and Membershiptutorial.

  • Redirect the user to the home page or to the page they came from.

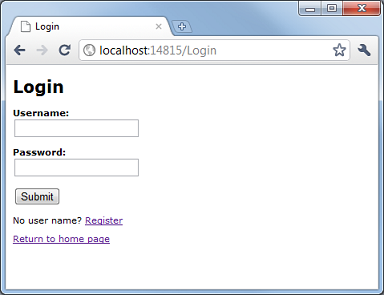
Create a login page


技术分享

The code for the Login.cshtml page is here.


Must do
    • Create Login.cshtml in the website root.

    • Add text boxes for the user name and password plus a submit button.

  • On submit, call WebSecurity.Login to log them in. If this returns true, redirect them to (e.g.) the home page; otherwise, chide them.
    if(IsPost)
    {
    username = Request["username"];
    password = Request["password"];
    if(WebSecurity.Login(username,password,true))
    {
    Response.Redirect("~/Home");
    }
    else
    {
    errorMessage = "Login was not successful.";
    }
    }
Nice to do
    • On initial display (GET), call WebSecurity.IsAuthenticated first to see if they‘re already logged in. If true, display their current user name (WebSecurity.CurrentUserName) and a link to the Logout page.
      @if(WebSecurity.IsAuthenticated)
      {
      <p>You are currently logged in as @WebSecurity.CurrentUserName.
      <a href="@Href("~/Logout")">Log out</a>
      </p>
      }

    • Include a link in the page to the Register page.
Do in real app
    • Include a "Remember me" check box and pass the value (true/false) to the version of the WebSecurity.Login method that accepts this parameter.


    • Redirect the user to the home page or to the page they came from.

  • Create a password-recovery page. See "Letting Users Generate a New Password" in the Adding Security and Membership  tutorial. (Your site must be configured to send email.)

Create a logout page


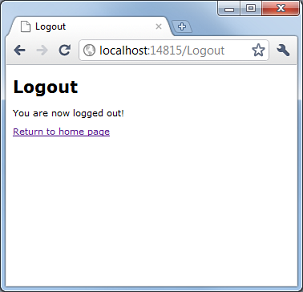
A logout page just logs the user out. (Under the covers, it removes the cookie that‘s on the user‘s browser that lets ASP.NET know that the user is authenticated.)

The code for the Logout.cshtml page is here.
技术分享


Must do
    • Create Logout.cshtml in the website root.

  • As soon as the page runs, call WebSecurity.Logout. You don‘t need to worry about whether they‘re logged in first.
Nice to do
  • Add some informative text.
  • Include link in the page to the Home page.
Do in real app
  • Just redirect them immediately to home or wherever they came from.

Protect content


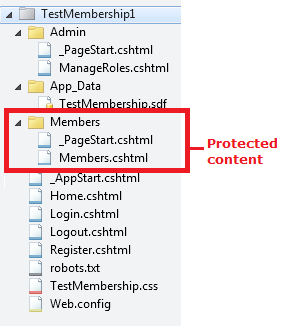
Protected content can only be viewed by people are logged in. Basically what you do is put pages into a folder that‘s guarded by a piece of code that only lets them through if they‘re logged in (authenticated). It doesn‘t matter what user name they‘re logged in under, just that they‘re logged in.
技术分享

The code for the _PageStart.cshtml page is here.

Must do
    • Create a subfolder (e.g. Members).

    • Put files you want to protect into this subfolder.

    • In the Members subfolder, create a file named _PageStart.cshtml. When any page in the subfolder is requested, this page runs first.

  • In the _PageStart.cshtml file, call WebSecurity.IsAuthenticated to determine whether the user is logged in. If they are not, redirect them to the login page:
    if (!WebSecurity.IsAuthenticated) 
    {
    Response.Redirect("~/Login");
    }
Do in real app
  • Code the redirect so that it passes the requested page to the login page, which could then redirect back to the requested page when they‘ve logged in.

Create a page to manage roles


Roles are a convenient way to group users together. This is handy if you want different logged-in users to have access to different pages. The typical example is that all users can access pages in the root. Logged-in users can access pages in a members folder, plus all public pages. And then users in a specific role (e.g., "Admin") are allowed access to pages in yet another subfolder, plus member pages, plus public pages. 

There are no built-in roles; a role is just a name that you create. You can think of it as a tag you assign to a user name. You can then check for that tag as a way to determine whether you‘ll allow someone access to pages.

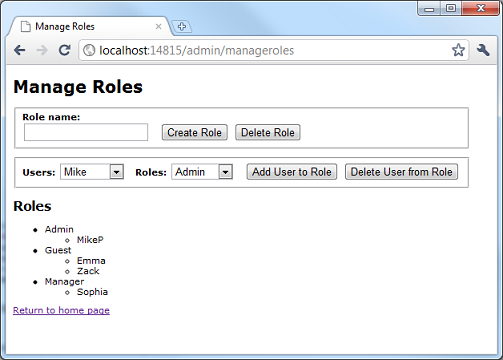
You typically don‘t let users manage roles themselves. Unlike the other pages for this little sample, the page you‘ll create here is one that should be available only to an administrator or super-user (you). In a slightly weird meta way, the page should be protected so that only users in some sort of admin role can get to it. In this example, the page is assumed to be in anAdmin folder that you‘ll protect. (However, you‘ll protect the folder only after you‘ve put your own user name into the admin role.) The page shown here is just one of many ways you could manage roles. However, it does illustrate the fundamental tasks: creating (and deleting) roles, and adding (or removing) users in roles.

The code for the ManageRoles.cshtml page is here

技术分享

Note that in this case there‘s no "must do," because there‘s no one way to manage roles. For example, you could do everything by directly editing the database in WebMatrix. So this just shows some ways you could use APIs to manage roles.  


Nice to do
    • Create a subfolder (e.g. Admin) in the website.

  • In the Admin folder, create a page named ManageRoles.cshtml.
Everything listed in this section happens in that page. I‘ll break it down into pieces because it‘s a little more complex than the other pages.


Display existing roles (and users in roles):
    • Call Roles.GetAllRoles to return a list, then loop through it and display the list in the page.

  • (Optional) List the users who are in a role. For each role (see previous point), call Roles.GetUsersInRole. This also returns a list that you can loop through (nested) to display the names for that role.

    Here they are combined:
    <ul>
    @foreach(var role in Roles.GetAllRoles())
    {
    <li>@role</li>
    <ul>
    @foreach(var user in Roles.GetUsersInRole(role))
    {
    <li>@user</li>
    }
    </ul>
    }
    </ul>

Create and delete roles:
    • Add a text box for the role names, one button to create a role, and another button to delete the role.

    • On form submit, check which button was clicked. If it was the Create Role or Delete Role button ...

    • Get the role name.

    • To create the role, call Roles.RoleExists to see if the name already exists. If not, and if the role name isn‘t empty, call Roles.CreateRole.
      // Create new role
      if(!Request["buttonCreateRole"].IsEmpty())
      {
      roleName=Request["textRoleName"];
      if(!Roles.RoleExists(roleName) && !roleName.IsEmpty())
      {
      Roles.CreateRole(roleName);
      }
      } // if(buttonCreateRole)

    • To delete the role, call Roles.GetUsersInRole to see if the role has users in it. If not, and if the role name isn‘t empty, callRoles.DeleteRole. You don‘t need to check whether the role exists; if you call Roles.DeleteRole for a non-existent role, there‘s no error.
      // Delete role
      if(!Request["buttonDeleteRole"].IsEmpty())
      {
      roleName=Request["textRoleName"];
      if(Roles.GetUsersInRole(roleName).Length == 0 &&
      !roleName.IsEmpty())
      {
      // true means throw if any users are in this role
      Roles.DeleteRole(roleName, true);
      }
      } // if(buttonDeleteRole)


Add and delete users in roles:
    • Display users in a listbox. To do this, connect to the database and query the UserProfile table. Then loop through the list and add the names to a <select> element so you can pick one. (There‘s aMembership.GetAllUsers method that should do this, but it isn‘t working right, so you have to manually query the database.)
      var db = Database.Open("TestMembership");
      var selectQueryString =
      "SELECT UserId, Email FROM UserProfile";
      // ...
      <label for="selectUserName">Users:</label>
      <select name="selectUserName">
      @foreach(var row in db.Query(selectQueryString))
      {
      <option>@row.Email</option>
      }
      </select>

    • List roles in a listbox. Call Roles.GetAllRoles again and this time put all the roles in a <select> element.
      <label for="selectRoleName">Roles:</label>
      <select name="selectRoleName">
      @foreach(var role in Roles.GetAllRoles())
      {
      <option>@role</option>
      }
      </select>

    • Add an Add User To Role button and a Delete User From Rolebutton.

    • On form submit, check which button was clicked. If it was the Add User in Role or Delete User from Role buttons, ...

    • To add a user to a role, get the user name from the user listbox and the role name from the roles listbox. If the user is not already in that role, call Roles.AddUsersToRoles. Note the plural in the method name. The method takes arrays of users and roles, because it can add multiple users to multiple roles at once. So you have to create 1-element arrays and add the user name and role to the arrays before you call the method:
      string[] userNames = new string[1];
      string[] roleNames = new string[1];
      // ...

      // Add user to role
      if(!Request["buttonAddUserToRole"].IsEmpty())
      {
      userNames[0] = Request["selectUserName"];
      roleNames[0] = Request["selectRoleName"];
      if(!Roles.IsUserInRole(userNames[0], roleNames[0])){
      Roles.AddUsersToRoles(userNames, roleNames);
      }
      } // if(buttonAddUserToRole)

      Update 7 Feb 2011 For a cleaner and more elegant way to handle the arrays in this example (and the next one), see the comment from "Rik".


  • To delete a user from a role, get the name and role. If the user is in that role, call Roles.RemoveUsersFromRoles. This takes arrays as arguments, so as with Roles.AddUsersToRoles, you have to put the user and role name into 1-element arrays:
    // Delete user from role
    if(!Request["buttonDeleteUserFromRole"].IsEmpty())
    {
    userNames[0] = Request["selectUserName"];
    roleNames[0] = Request["selectRoleName"];
    if(Roles.IsUserInRole(userNames[0], roleNames[0]))
    {
    Roles.RemoveUsersFromRoles(userNames,
    roleNames);
    }
    } // if(buttonDeleteUseFromRole)
Do in real app
    • Limit the roles to just a few that are needed for the app, instead of allowing arbitrary roles to be created. In fact, you might just create the one or two roles you need in the database directly and likewise assign the few users to roles that need to be in a specific role.

  • When listing roles, not try to list every user in every role, or even just try to list every user. (In real apps, there can be thousands of users.)

Protect content by role


The point of roles is to protect content so only users in certain roles can see the content. This is almost exactly like just protecting content by limiting it to authenticated users. Note that you should add this protection after you‘ve added yourself to the Admin role, else you‘ll never be able to get to this page.

The code for _PageStart.cshtml page for roles is here.

Must do
    • Create a subfolder (e.g. Admin) in the website. (You did this forManageRoles.cshtml already.)

    • Put files you want to protect into this subfolder. (Ditto, sort of)

    • In the Admin subfolder, create a _PageStart.cshtml file.

  • In the _PageStart.cshtml file, call Roles.IsUserInRole, passing it the current user name (WebSecurity.CurrentUserName) and the name of the role you want to check. If the current user is not in that role, redirect them:
    if (!Roles.IsUserInRole(WebSecurity.CurrentUserName, 
    "Admin"))
    {
    Response.Redirect("~/Home");
    }
Nice to do
  • In the example, rather than redirecting the user to the home page or whatever, I return an HTTP "Forbidden" code (403). Looks extra-forbidding.
    if (!Roles.IsUserInRole(WebSecurity.CurrentUserName, 
    "Admin"))
    {
    Response.SetStatus(HttpStatusCode.Forbidden);
    }

Ok, that‘s it. I hope this is useful and hasn‘t been presented in an unusually confusing way. If you have questions, leave a comment.

郑重声明:本站内容如果来自互联网及其他传播媒体,其版权均属原媒体及文章作者所有。转载目的在于传递更多信息及用于网络分享,并不代表本站赞同其观点和对其真实性负责,也不构成任何其他建议。