iOS Programming UIStoryboard 故事板
iOS Programming UIStoryboard
In this chapter, you will use a storyboard instead. Storyboards are a feature of iOS that allows you to instantiate and lay out all of your view controllers in one XIB-like file. Additionally, you can wire up view controllers in the storyboard to dictate how they get presented to the user.
在本章中,你将使用一个storyboard。Storyboards 是iOS 的一个特色允许你初始化和放置所有你的view controllers 在一个XIB-like文件中。另外你可以装配你的view controller 在你的storyboard 来显示他们怎样显示给用户的。
The purpose of a storyboard is to minimize some of the simple code a programmer has to write to create and set up view controllers and the interactions between them.
一个storyboard 的目的是缩小一些simple code一个程序员必须创建和设置view controller和在他们之间的交流。
1 Creating a Storyboard
Create a new iOS Empty Application and name it Colorboard
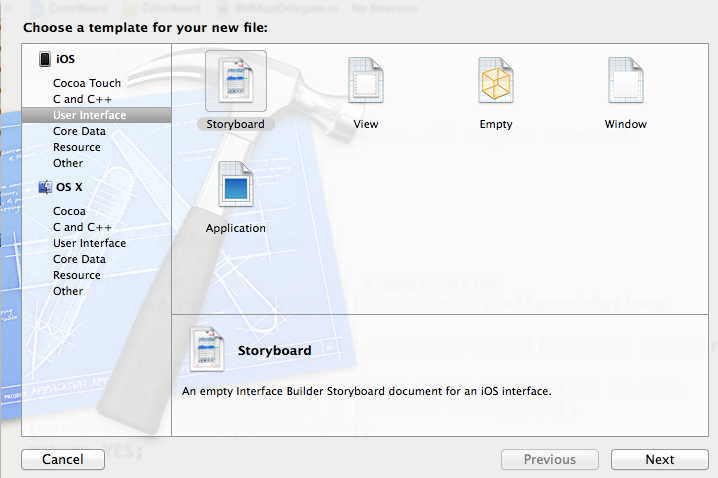
Then, select New File... from the New menu. Select User Interface from the iOS section. Then, select the Storyboard template and click Next

A storyboard is a lot like a XIB, except it allows you to lay out the relationships between view controllers in addition to laying out their interfaces.
一个storyboard 非常像一个XIB除了他允许你lay out view controller 之间的关系除了放置他们的interfaces之外。
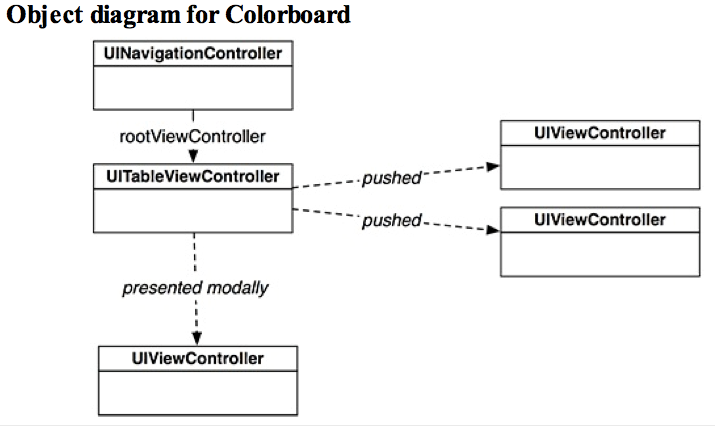
The Colorboard application will have a total of five view controllers, including a UINavigationController and a UITableViewController.

Using a storyboard, you can set up the relationships shown in Figure 28.3 without writing any code.
To get started, open the utility area and the Object Library. Drag a Navigation Controller onto the canvas. The
canvas will now look like

In addition to the UINavigationController object you asked for, the storyboard took the liberty of creating three other objects: the view of the navigation controller, a UITableViewController, and the view of the UITableViewController. In addition, the UITableViewController has been made the root view controller of the navigation controller.
除了你要求的UINavigationControler 对象,storyboard 还自由的创建了其他三个对象:view of the navigation controller,a UITableViewController ,and? view of the UITableViewController.另外,UITableViewController 还被设置为navigation controller 的root view controller.
The two view controller instances are represented by the black bars on the canvas, and their views are shown above them. You configure the view the same as you would in a normal XIB file. To configure the view controller itself, you select the black bar.
两个view controller 实例由在canvas 上的black bars 代表,他们的views 在他们上面显示。你配置view 与普通的XIB file 文件一样。为了配置view controller itself,你要选择black bar.
Before you go any further, you need to tell your application about this storyboard file. Select the Colorboard project from the project navigator. Then, select the Colorboard target and the General tab. Locate the Main Interface field and enter Colorboard (Figure 28.5) or select Colorboard.storyboard from the dropdown.
在你继续之前,你需要告诉application 关于你的storyboard file.选择哪个color board 工程,选择cjolorbard target 和general tab.
定位到main interface
?
When an application has a main storyboard file, it will automatically load that storyboard when the application launches. In addition to loading the storyboard and its view controllers, it will also create a window and set the initial view controller of the storyboard as the root view controller of the window.
当一个application 有一个main storyboard file ,它将自动的加载storyboard 当启动应用时。除了加载storyboard 和它的view controllers ,它仍然创建了一个windows 和设置storyboard 的initial view controller 作为这个window的root view controller.
You can tell which view controller is the initial view controller by looking at the canvas in the storyboard file – the initial view controller has an arrow that fades in as it points to it.
你可以辨别哪个view controller 是initial view controller 通过查看在storyboard file的 canvas —the? initial view controller 有一个箭头 ,指向它。
Since a storyboard file supplies the window for an application, the application delegate does not need to create a window.
因为storyboard file 提供了一个应用的窗口,因此,application delegate 不需要创建一个window。
In BNRAppDelegate.m, remove the code from application:didFinishLaunchingWithOptions: that creates the window.
- (BOOL)application:(UIApplication *)application
didFinishLaunchingWithOptions:(NSDictionary *)launchOptions {
return YES;
}
2 UITableViewControllers in Storyboards
在Storyboards 里的UITableViewControllers
When using a UITableViewController, you typically implement the appropriate data source methods to return the content of each cell. This makes sense when you have dynamic content – like a list of items that may change – but it is a lot of work when you have a table whose content never changes. Storyboards allow you to add static content to a table view without having to implement the data source methods.
当你用UITableViewController,你一般的实现恰当的data source methods 返回每个cell 的内容。这变得很有意义当你有动态的内容时,但是有许多工作 你有一个table 它的内容从来都不变。 storyboards 允许你添加Static? content 到一个table view controller 不去实现data? source methods.
To see how easy this is, you are going to add a UITableViewController to the storyboard and give it static content.
If there is already a second view controller in your Storyboard next to the navigation controller, select its black bar (the representation of the view controller itself), and delete it.
Next, drag a UITableViewController from the library onto the canvas. To set this table view controller as the root view controller of the navigation controller, Control-drag from the navigation controller‘s view to the table view controller‘s view. Let go, and from the black panel that appears, select root view (Figure 28.7).
拖动一个UITableViewController到canvas 上 。control -drag 从navigation controller ‘s view 到table view controller的view。显示black panel ,选择root view .
Remember that despite dragging between views, these properties are being set on the view controllers themselves.
记住尽管是在两个view 中的dragging ,这些属性是在两个view controller 自己上设置的。
In the middle of this arrow is an icon that represents the type of relationship between the two view controllers
中间的arrow 是一个icon代表了连个view controller 关系的类型。
Next, select the Table View of the UITableViewController. In the attributes inspector, change the Content pop-up menu to Static Cells
紧接着,选择UITableViewController的Table view。在attributes inspector ,改变content pop-up menu 为static cells.
Back on the canvas, the selected cell will now say Title. Double-click on the text and change it to Red.
Repeat the same steps for the second cell, but have the title read Green. Let‘s get rid of the third cell; select it and press Delete.

Finally, select the navigation bar – the area above the first cell. This is present because the table view controller is embedded in a navigation controller. In the Attributes Inspector, change its title to Colors.
3 Segues
Most iOS applications have a number of view controllers that users navigate between. Storyboards allow you to set up these interactions as segues without having to write code.
大部分iOS 应用有许多view controller 用户在他们之间导航。storyboards 允许你设置这些interactions 为segues 不用写任何代码。
A segue moves another view controller‘s view onto the screen when triggered and is represented by an instance of UIStoryboardSegue. Each segue has a style, an action item, and an identifier.
一个segue 当触发时会移动到另一个view controller ‘s view,别一个UIStoryboardSegue 实例。每个segue 有一个style,一个action item和一个identifier.
The style of a segue determines how the view controller will be presented, such as pushed onto the stack or presented modally. The action item is the view object in the storyboard file that triggers the segue, like a button, a bar button item, or another UIControl. The identifier is used to programmatically access the segue. This is useful when you want to trigger a segue that does not come from an action item, like a shake or some other interface element that cannot be set up in the storyboard file.
一个segue 的style 决定了view controller 将如何被展现,例如pushed onto 到stack或者presented modally.The action? item 是view object 在storyboard file中触发了segue,比如一个button,a bar button item ,或者是UIControl.The Identifier在通过编程获取segue时很有用。当你想触发一个segue 不是通过一个action item ,像shake 或者其他的interface element 不能在storyboard file 中设置。
A push segue pushes a view controller onto the stack of a navigation controller.
一个push segue? 把一个view controller 推送到navigation controller 的栈上。
You will need to set up two more view controllers in your storyboard, one whose view‘s background is red, and the other, green. The segues will be between the table view controller and these two new view controllers. The action items will be the table view‘s cells; tapping a cell will push the appropriate view controller onto the navigation controller‘s stack.
segues 是将在table view controller 和这两个 新的view controller 之间。action items 将是table view ‘s cells.点击一个cell将推送恰当的view controller 到navigation controller的stack上。
Drag two UIViewController objects onto the canvas. Select the View of one of the view controllers and, in the attributes inspector, change its background color to red. Do the same for the other view controller‘s view to set its background color to green.
Next, select the cell titled Red. Control-drag to the view controller whose view has the red background. A black panel titled Storyboard Segues will appear. This panel lists the possible styles for this segue. Select Push.
Then, select the Green cell and Control-drag to the other view controller. Your canvas should look like
Note that push segues only work if the origin of the segue is inside a navigation controller. Fortunately, the origin of these segues is the table view controller, which meets this requirement.
注意到push segues 只有segue 的祖先是在navigation controller 里面才工作。幸运的是,这些segues的origin是table view controller ,满足这些要求。? ???
Now let‘s look at another style of segue – a Modal segue. Drag a new UIViewController onto the canvas. Set its view‘s background color to blue. You want this segue‘s action item to be a bar button item on the table view controller‘s navigation item.
现在看另一种类型的segue-Modal segue.拖动一个新的UIViewController到canvas 上。设置view 的background color 为blue。你想这个segue‘s action item 是在table view controller ‘s navigation item 的一个bar button item .
Drag a Bar Button Item from the library onto the right corner of the navigation bar at the top of the table view controller‘s view.
In the attributes inspector, change its Identifier to Add. Then, Control-drag from this bar button item to the view controller you just dropped on the canvas. Select Modal from the black panel.
To fix this, drag a UINavigationController onto the canvas and delete the UITableViewController
为了修复这个,拖动一个UINavigationController ,删除UITableViewController。
Delete the existing modal segue, and instead have the + item trigger a modal segue to the navigation controller.
删除应存在的modal segue,取而代之让+item 触发一个modal segue
到navigation controller .
Now that the modal view controller is within a navigation controller, it has a navigation bar at its top. Drag a bar button item to the right side of this navigation bar. Within the attributes inspector, change its Identifier to Done.
现在你的modal view controller 在一个navigation controller 内部,它有一个navigation bar 在它的顶部。拖动一个bar button item到navigation bar 的右侧。‘
You will need to write a method to dismiss the modal view controller and then connect this method to the Done button.
你需要写一个方法dismiss? 这个modal view controller 然后连接这个方法到Done button.
To write code for a view controller in a storyboard, you have to create a subclass of UIViewController and specify in the storyboard that the view controller is an instance of your subclass.
为了为一个在storyboard 里的view controller 写代码,你必须创建一个UIViewController 的子类,并指明在storyboard 那个view controller 是你子类的一个实例
?
Let‘s create a new UIViewController subclass to see how this works. Create a new NSObject subclass and name it BNRColorViewController.
In BNRColorViewController.h, change the superclass to be UIViewController.
@interface BNRColorViewController : UIViewController
@end
Then in BNRColorViewController.m, implement a method to dismiss itself.
- (IBAction)dismiss:(id)sender
{
[self.presentingViewController dismissViewControllerAnimated:YES
}
completion:nil];
Open Colorboard.storyboard again. Select the black bar underneath the modally presented (blue) view controller. (This is called the scene dock.) In the identity inspector, change the Class to BNRColorViewController
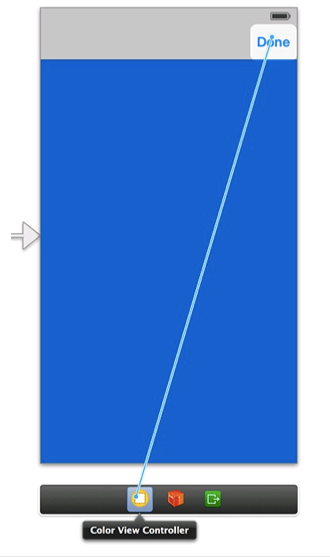
Now, after making sure you are zoomed in, select the Done button. Control-drag from the button to this view controller icon and let go – when the panel appears, select the dismiss: method

4 Enabling Color Changes
You will now extend the Colorboard application to allow the user to choose a color and save it to a list of favorite colors.
Back in Colorboard.storyboard, add one UITextField, three UILabel objects, and three UISlider objects to the view of BNRColorViewController so it looks like

Let‘s have the background color of BNRColorViewController‘s view match the slider values. In BNRColorViewController.m, add outlets to the text field and three sliders in the class extension.
@interface BNRColorViewController ()
@property (nonatomic, weak) IBOutlet UITextField *textField; @property (nonatomic, weak) IBOutlet UISlider *redSlider;
@property (nonatomic, weak) IBOutlet UISlider *greenSlider; @property (nonatomic, weak) IBOutlet UISlider *blueSlider;
@end
@implementation
All three sliders will trigger the same method when their value changes. Implement this method in BNRColorViewController.m.
?
- (IBAction)changeColor:(id)sender
{
float red = self.redSlider.value;
float green = self.greenSlider.value;
float blue = self.blueSlider.value;
UIColor *newColor = [UIColor colorWithRed:red
green:green blue:blue
alpha:1.0]; self.view.backgroundColor = newColor;
}
Now open Colorboard.storyboard and connect the outlets from Color View Controller (the first icon in the scene dock below the BNRColorViewController view) to the text field and three sliders. Then Control-drag from each slider to the Color View Controller and connect each to the changeColor: method.
Build and run the application. Moving the sliders will cause the view‘s background color to match.
5 Passing Data Around
Prototype cells allow you to configure the various cells you will want to return in the data source methods and assign a reuse identifier to each one.
Prototype cells 允许你配置各种cells你想返回在data source methods 并给每一个分配reuse identifier.
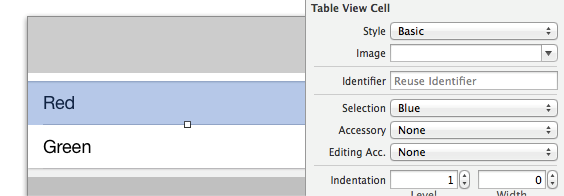
Then select the UITableViewCell and set its reuse identifier to UITableViewCell

In order to supply this table view controller with data for its table view, you will need to create a new UITableViewController subclass. Create a new NSObject subclass named BNRPaletteViewController.
In BNRPaletteViewController.h, change the superclass to be UITableViewController.
@interface BNRPaletteViewController : UITableViewController
In BNRPaletteViewController.m, import BNRColorViewController.h and add an NSMutableArray to the class extension.
#import "BNRPaletteViewController.h"
#import "BNRColorViewController.h"
@interface BNRPaletteViewController ()
@property (nonatomic) NSMutableArray *colors;
@end
?
@implementation BNRPaletteViewController
Next, implement viewWillAppear: and the table view data source methods in
BNRPaletteViewController.m.
- (void)viewWillAppear:(BOOL)animated
{
[super viewWillAppear:animated];
[self.tableView reloadData]; }
- (NSInteger)tableView:(UITableView *)tableView
numberOfRowsInSection:(NSInteger)section
{
return [self.colors count];
}
- (UITableViewCell *)tableView:(UITableView *)tableView
cellForRowAtIndexPath:(NSIndexPath *)indexPath
{
UITableViewCell *cell =
[tableView dequeueReusableCellWithIdentifier:@"UITableViewCell" forIndexPath:indexPath];
return cell; }
?
- (UITableViewCell *)tableView:(UITableView *)tableView
cellForRowAtIndexPath:(NSIndexPath *)indexPath
{
UITableViewCell *cell =
[tableView dequeueReusableCellWithIdentifier:@"UITableViewCell" forIndexPath:indexPath];
return cell; }
?
Next, create a new NSObject subclass named BNRColorDescription that will represent a user-defined color.
In BNRColorDescription.h, add properties for a UIColor and a name.
@interface BNRColorDescription : NSObject
@property (nonatomic) UIColor *color;
@property (nonatomic, copy) NSString *name;
@end
Then, in BNRColorDescription.m, override init to set default values for these properties. @implementation BNRColorDescription
- (instancetype)init
{
self = [super init]; if (self) {
_color = [UIColor colorWithRed:0 green:0
blue:1 alpha:1];
_name = @"Blue"; }
return self; }
@end
At the top of BNRPaletteViewController.m, import BNRColorDescription.h. Then override the colors accessor to lazily instantiate the array and add a new BNRColorDescription to the array.
#import "BNRPaletteViewController.h" #import "BNRColorDescription.h"
@implementation BNRPaletteViewController
- (NSMutableArray *)colors
{
if (!_colors) {
_colors = [NSMutableArray array];
BNRColorDescription *cd = [[BNRColorDescription alloc] init];
[_colors addObject:cd]; }
return _colors; }
Also, update the data source method in BNRPaletteViewController.m to display the name of the color
BNRColorDescription *color = self.colors[indexPath.row]; cell.textLabel.text = color.name;
Before we move on, open BNRColorViewController.h and add two new properties: one that determines whether you are editing a new or existing color, and another that indicates which color you are editing. Do not forget to import BNRColorDescription.h at the top.
添加两个属性一个决定你是否在编辑一个新的或已经存在的color,另一个暗示哪个color 你在编辑。
#import "BNRColorDescription.h"
@interface BNRColorViewController : UIViewController
@property (nonatomic) BOOL existingColor;
@property (nonatomic) BNRColorDescription *colorDescription;
@end
Whenever a segue is triggered on a view controller, it gets sent the message prepareForSegue:sender:.
无论什么时候segue 被触发一个view controller,它会发送prepareForSegue:sender:.
This method gives you both the UIStoryboardSegue, which gives you information about which segue is happening, and the sender, which is the object that triggered the segue (a UIBarButtonItem or a UITableViewCell, for example).
这个方法提供了两个UIStoryboardSegue,提供消息哪个segue将要发生,和sender,哪个对象触发了segue。
The segue gives you three pieces of information to use: the source view controller (where the segue is originating from), the destination view controller (where you are segueing to), and the identifier of the segue. The identifier is how you can differentiate the various segues. Let‘s give your two segues useful identifiers.
segue提供给你三方面的信息:the source view controller (segue 源于哪里),destination view controller (segueing 到哪里去),the? identifier of the segue. identifier 是你能怎样区分不同的segues 。
Open Colorboard.storyboard again. Select the modal segue and open its attribute inspector. For the identifier, type in NewColor. Next, select the push segue and give it the identifier ExistingColor.
With your segues identified, you can now pass your color objects around. Open BNRPaletteViewController.m and implement prepareForSegue:sender:.
?
- (void)prepareForSegue:(UIStoryboardSegue *)segue sender:(id)sender
{
if ([segue.identifier isEqualToString:@"NewColor"]) {
// If we are adding a new color, create an instance
// and add it to the colors array
BNRColorDescription *color = [[BNRColorDescription alloc] init]; [self.colors addObject:color];
// Then use the segue to set the color on the view controller UINavigationController *nc =
(UINavigationController *)segue.destinationViewController; BNRColorViewController *mvc =
(BNRColorViewController *)[nc topViewController]; mvc.colorDescription = color;
}
else if ([segue.identifier isEqualToString:@"ExistingColor"]) {
// For the push segue, the sender is the UITableViewCell NSIndexPath *ip = [self.tableView indexPathForCell:sender]; BNRColorDescription *color = self.colors[ip.row];
// Set the color, and also tell the view controller that this // is an existing color
BNRColorViewController *cvc =
(BNRColorViewController *)segue.destinationViewController; cvc.colorDescription = color;
cvc.existingColor = YES;
} }
Open BNRColorViewController.m and override viewWillAppear: to get rid of the Done button if existingColor is YES.
- (void)viewWillAppear:(BOOL)animated
{
[super viewWillAppear:animated];
// Remove the ‘Done‘ button if this is an existing color if (self.existingColor) {
self.navigationItem.rightBarButtonItem = nil; }
}
Then, still in BNRColorViewController.m, override viewDidLoad to set the initial background color, slider values, and color name.
- (void)viewDidLoad
{
[super viewDidLoad];
UIColor *color = self.colorDescription.color;
// Get the RGB values out of the UIColor object float red, green, blue;
[color getRed:&red
green:&green blue:&blue
alpha:nil];
// Set the initial slider values self.redSlider.value = red; self.greenSlider.value = green; self.blueSlider.value = blue;
// Set the background color and text field value self.view.backgroundColor = color; self.textField.text = self.colorDescription.name;
}
Finally, save the values when the view is disappearing.
- (void)viewWillDisappear:(BOOL)animated
{
[super viewWillDisappear:animated];
self.colorDescription.name = self.textField.text;
self.colorDescription.color = self.view.backgroundColor; }
Overall, storyboards make easy code easier and difficult code more difficult.
总之,storyboards 使得容易的代码更容易,复杂的代码复杂。
郑重声明:本站内容如果来自互联网及其他传播媒体,其版权均属原媒体及文章作者所有。转载目的在于传递更多信息及用于网络分享,并不代表本站赞同其观点和对其真实性负责,也不构成任何其他建议。


