Nagios利用NRPE监控Linux主机(3)
一、利用NRPE监控远程Linux的”本地信息“
上面已经对远程Linux 主机是否存活做了监控,而判断远程机器是否存活,我们可以使用ping 工具对其监测。还有一些远程主机服务,例如ftp、ssh、http,都是对外开放的服务,即使不用Nagios,我们也可以试的出来,随便找一台机器看能不能访问这些服务就行了。但是对于像磁盘容量,cpu负载这样的“本地信息”,Nagios只能监测自己所在的主机,而对其他的机器则显得有点无能为力。毕竟没得到被控主机的适当权限是不可能得到这些信息的。为了解决这个问题,nagios有这样一个附加组件--“NRPE”,用它就可以完成对Linux 类型主机"本地信息”的监控。
1、NRPE介绍
NRPE是Nagios的一个功能扩展,它可在远程Linux/UNIX主机上执行插件程序。通过在远程服务器上安装NRPE插件及Nagios插件程序来向Nagios监控平台提供该服务器的本地情况,如CPU负载,内存使用,磁盘使用等。这里将Nagios监控端称为Nagios服务器端,而将远程被监控的主机称为Nagios客户端。
Nagios监控远程主机的方法有多种,其方式包括SNMP,NRPE,SSH,NCSA等。这里介绍其通过NRPE监控远程Linux主机的方式。NRPE(Nagios Remote Plugin Executor)是用于在远端服务器上运行监测命令的守护进程,它用于让Nagios监控端基于安装的方式触发远端主机上的检测命令,并将检测结果返回给监控端。而其执行的开销远低于基于SSH的检测方式,而且检测过程不需要远程主机上的系统账号信息,其安全性也高于SSH的检测方式。
2、NRPE的工作原理
NRPE 总共由两部分组成:
check_nrpe 插件,位于监控主机上
NRPE daemon,运行在远程的Linux主机上(通常就是被监控机)
按照上图,整个的监控过程如下:
当Nagios 需要监控某个远程Linux 主机的服务或者资源情况时:
Nagios 会运行check_nrpe 这个插件,告诉它要检查什么;
check_nrpe 插件会连接到远程的NRPE daemon,所用的方式是SSL;
NRPE daemon 会运行相应的Nagios 插件来执行检查;
NRPE daemon 将检查的结果返回给check_nrpe 插件,插件将其递交给nagios做处理。
注意:NRPE daemon 需要Nagios 插件安装在远程的Linux主机上,否则,daemon不能做任何的监控。
3、在被监控端上,安装Nagios插件及NRPE
1、添加nagios用户
[root@localhost ~]# useradd -s /sbin/nologin nagios
2、安装nagios-plugins,因为NRPE依赖它
注意:请自行安装gcc make wget openssl openssl-devel等包。
[root@localhost ~]# wget http://sourceforge.net/projects/nagios/files/nrpe-2.x/nrpe-2.15/nrpe-2.15.tar.gz
[root@localhost ~]# wget

[root@localhost ~]# tar xf nagios-plugins-2.0.3.tar.gz -C /usr/local/src
[root@localhost ~]# cd /usr/local/src
[root@localhost src]# cd nagios-plugins-2.0.3/
[root@localhost nagios-plugins-2.0.3]# ./configure --with-nagios-user=nagios --with-nagios-group=nagios
[root@localhost nagios-plugins-2.0.3]# make && make install
3、安装NRPE
[root@localhost ~]# tar xf nrpe-2.15.tar.gz -C /usr/local/src
[root@localhost ~]# cd /usr/local/src
[root@localhost src]# cd nrpe-2.15/
[root@localhost nrpe-2.15]# ./configure --with-nrpe-user=nagios --with-nrpe-group=nagios --with-nagios-user=nagios --with-nagios-group=nagios --enable-command-args --enable-ssl

[root@localhost nrpe-2.15]# make all
[root@localhost nrpe-2.15]# make install-plugin
# 安装成守护进程
[root@localhost nrpe-2.15]# make install-daemon
# 安装配置文件
[root@localhost nrpe-2.15]# make install-daemon-config

# 编辑nrpe配置文件
[root@localhost ~]# vi /usr/local/nagios/etc/nrpe.cfg
allowed_hosts=192.168.11.103    # 修改为监控端的IP
4、启动nrpe
# 以守护进程的方式启动
[root@localhost ~]# /usr/local/nagios/bin/nrpe -c /usr/local/nagios/etc/nrpe.cfg -d
[root@localhost ~]# netstat -tulpn | grep nrpe
tcp        0      0 0.0.0.0:5666       0.0.0.0:*             LISTEN      30009/nrpe
tcp        0      0 :::5666            :::*                  LISTEN      30009/nrpe
为了方便,可以为nrpe编写启动脚本:
[root@localhost ~]# vi /etc/init.d/nrped
#!/bin/bash
# chkconfig: 2345 88 12
# description: NRPE DAEMON

NRPE=/usr/local/nagios/bin/nrpe
NRPECONF=/usr/local/nagios/etc/nrpe.cfg
case "$1" in
   start)
       echo -n "Starting NRPE daemon..."
       $NRPE -c $NRPECONF -d
       echo " done."
       ;;
   stop)
       echo -n "Stopping NRPE daemon..."
       pkill -u nagios nrpe
       echo " done."
       ;;
   restart)
       $0 stop
       sleep 2
       $0 start
       ;;
   *)
       echo "Usage: $0 start|stop|restart"
       ;;
   esac
exit 0

[root@localhost ~]# chmod +x /etc/init.d/nrped
[root@localhost ~]# chkconfig --add nrped
[root@localhost ~]# chkconfig nrped on
或者通过xinetd服务来管理nrpe,当然前提是安装了xinetd服务。
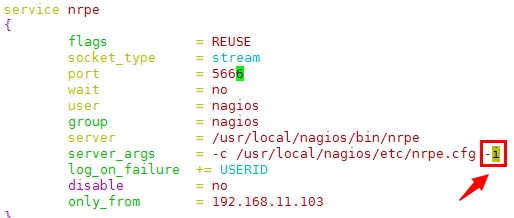
这里只需要修改only_from项即可,修改为Nagios监控中心的IP地址,这样一来监控端就可以和被监控端进行nrpe通信了。
[root@localhost ~]# vi /etc/xinetd.d/nrpe
nrpe有两种运行模式:
-i        # Run as a service under inetd or xinetd
-d        # Run as a standalone daemon
定义服务端口:在/etc/services中增加一行
[root@localhost ~]# vi /etc/services
nrpe            5666/tcp                # nagios_client

## 然后重启 xinetd服务即可
# [root@localhost ~]# service xinetd restart
4、在监控端上安装NRPE插件
需安装openssl openssl-devel包
[root@localhost ~]# wget
[root@localhost ~]# tar xf nrpe-2.15.tar.gz -C /usr/local/src
[root@localhost ~]# cd /usr/local/src
[root@localhost src]# cd nrpe-2.15/

[root@localhost nrpe-2.15]# ./configure --with-nrpe-user=nagios --with-nrpe-group=nagios --with-nagios-user=nagios --with-nagios-group=nagios --enable-command-args --enable-ssl

[root@localhost nrpe-2.15]# make all
[root@localhost nrpe-2.15]# make install-plugin
# 安装完成后,会在Nagios安装目录的libexec下生成check_nrpe的插件
5、使用nrpe监控LINUX主机
[root@localhost ~]# cd /usr/local/nagios/libexec/
# 我们通过 -h 选项,可以知道插件使用的语法格式
[root@localhost libexec]# ./check_nrpe -h

[root@localhost libexec]# ./check_nrpe -H 192.168.11.101
NRPE v2.15
# 如果出现上述提示,那么说明能够正常监控的

[root@localhost ~]# cd /etc/nagios/monitor/
## 定义命令
# vim command.cfg
define command
   {
       command_name check_nrpe
       command_line $USER1$/check_nrpe –H "$HOSTADDRESS$" -c $ARG1$
   }

## 定义主机
# vim hosts.cfg
define host{
       use             linux-server
       host_name       linuxhost
       alias           My linux host
       address         192.168.1.12
       }

## 定义服务
# vim services.cfg
define service{
       use                     generic-service
       host_name               linuxhost
       service_description     CHECK USERS
       check_command           check_nrpe!check_users
       }
define service{
       use                     generic-service
       host_name               linuxhost
       service_description     load
       check_command           check_nrpe!check_load
       }
define service{
       use                     generic-service
       host_name               linuxhost
       service_description     disk sda1
       check_command           check_nrpe!check_sda1
       }
define service{
       use                     generic-service
       host_name               linuxhost
       service_description     Zombile procs
       check_command           check_nrpe!check_zombie_procs
       }
define service{
       use                     generic-service
       host_name               linuxhost
       service_description     total procs
       check_command           check_nrpe!check_total_procs
       }

注释:
# check_nrpe –H 被监控的主机 -c 要执行的监控命令
注意:-c 后面接的监控命令必须是nrpe.cfg 文件中定义的。也就是NRPE daemon只运行nrpe.cfg中所定义的命令。
### 在被监控端查看
# grep -v -e ‘^#‘ -e ‘^$‘ /usr/local/nagios/etc/nrpe.cfg

# check_nrpe!后面接的命令是在 /usr/local/nagios/etc/nrpe.cfg里写定义好的命令,如下面只有 # 五个,中括号内的为命令名, [command_name]
# 如果我们想定义更多的命令, 添加在这里就可以了
command[check_users]=/usr/local/nagios/libexec/check_users -w 5 -c 10
command[check_load]=/usr/local/nagios/libexec/check_load -w 15,10,5 -c 30,25,20
command[check_sda1]=/usr/local/nagios/libexec/check_disk -w 20% -c 10% -p /dev/sda1
command[check_zombie_procs]=/usr/local/nagios/libexec/check_procs -w 5 -c 10 -s Z
command[check_total_procs]=/usr/local/nagios/libexec/check_procs -w 150 -c 200

检查语法错误:
# /usr/local/nagios/bin/nagios -v /etc/nagios/nagios.cfg
没有提示错误,则下一步
# service nagios restart然后我们打开Nagios Web监控页查看
OK, 可以看到我们刚才定义的主机linux-192.168.11.101已经被监控。
6、Nagios邮件报警配置
安装sendmail 组件
首先要确保sendmail 相关组件的完整安装,我们可以使用如下的命令来完成sendmail 的安装:
# yum install -y sendmail*
然后重新启动sendmail服务:
# service sendmail restart
然后发送测试邮件,验证sendmail的可用性:
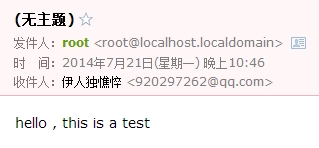
# echo "Hello World" | mail [email protected]
OK, 注意QQ邮箱一般会拦截邮件,需要添加白名单才可以收到邮件。
修改上面的配置:
# cd /etc/nagios/monitor
# vim hosts.cfg
    #    use             linux-server
我们发现它使用的linux-server这个模板, 然后我们去看一下linux-server模板的定义:

# vim templates.cfg
    # contact_groups                  admins
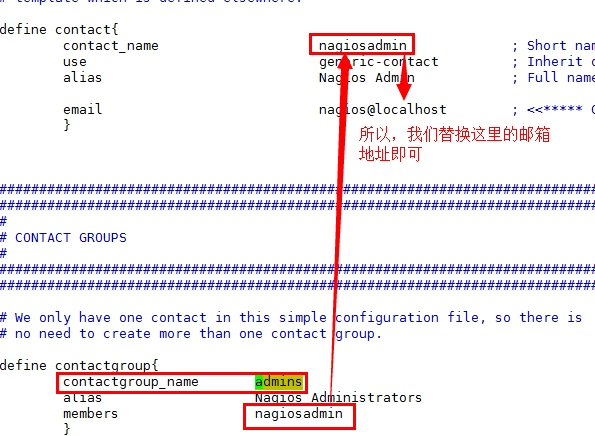
找到linux-server的定义,发现其配置的contact_groups为 admins, 然后我们去看admins的定义:

# vim contacts.cfg
转了一圈,终于找到最终的地方。
然后,邮件是如何发送的呢? 请自己找找看。 提示:generic-contact
还有很多地方需要学习, 先写到这里,回头再改改
本文出自 “Share your knowledge” 博客,请务必保留此出处http://skypegnu1.blog.51cto.com/8991766/1533406
郑重声明:本站内容如果来自互联网及其他传播媒体,其版权均属原媒体及文章作者所有。转载目的在于传递更多信息及用于网络分享,并不代表本站赞同其观点和对其真实性负责,也不构成任何其他建议。


