corosync(pacemaker) + drbd 实现 HA Mariadb
实验环境
    OS: CentOS 6.6
    soft:
        crmsh-2.1-1.6.x86_64.rpm
        drbd84-utils-8.9.1-1.el6.elrepo.x86_64.rpm
        kmod-drbd84-8.4.5-504.1.el6.x86_64.rpm
        pssh-debuginfo-2.3.1-2.el6.x86_64.rpm
    node1:
        hostname:node1.1inux.com
        IP:        :172.16.66.81
    node2:
        hostname:node2.1inux.com
        IP:        :172.16.66.82
一、前期环境准备:
1、配置hostname
分别编辑node1 和node2 的 /etc/hosts 文件添加以下内容
172.16.66.81    node1.1inux.com node1
172.16.66.82    node2.1inux.com node2
2、设定 node1 、node2基于ssh秘钥的认证
node1: [root@node1 ~]# ssh-keygen -t rsa -f /root/.ssh/id_rsa -P ‘‘ [root@node1 ~]# ssh-copy-id -i /root/.ssh/id_rsa.pub [email protected] node2: [root@node2 ~]# ssh-keygen -t rsa -f /root/.ssh/id_rsa -P ‘‘ [root@node2 ~]# ssh-copy-id -i /root/.ssh/id_rsa.pub [email protected]
3、设置时间同步
在node1上输入以下命令:
[root@node1 ~]# ntpdate 172.16.0.1 ; ssh node2 ‘ntpdate 172.16.0.1‘
31 May 22:43:40 ntpdate[1847]: adjust time server 172.16.0.1 offset 0.000252 sec
31 May 22:43:41 ntpdate[1907]: adjust time server 172.16.0.1 offset 0.000422 sec
验证:
[root@node1 ~]# date; ssh node2 date
Sun May 31 22:43:43 CST 2015
Sun May 31 22:43:43 CST 2015
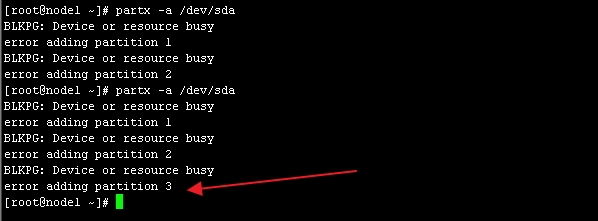
4、分别在node1、node2上创建两个大小都为2G的分区作为drbd设备  让内核读取分区表:如图3
[root@node1 ~]# partx -a /dev/sda //需多执行几次
在node2上执行同样的操作
二、安装drbd软件包
1、下载可信的安装包,并安装
drbd共有两部分组成:内核模块和用户空间的管理工具。其中drbd内核模块代码已经整合进Linux内核2.6.33以后的版本中,因此,如果您的内核版本高于此版本的话,你只需要安装管理工具即可;否则,您需要同时安装内核模块和管理工具两个软件包,并且此两者的版本号一定要保持对应。
目前适用CentOS 5的drbd版本主要有8.0、8.2、8.3三个版本,其对应的rpm包的名字分别为drbd, drbd82和drbd83,对应的内核模块的名字分别为kmod-drbd, kmod-drbd82和kmod-drbd83。而适用于CentOS 6的版本为8.4,其对应的rpm包为drbd和drbd-kmdl,但在实际选用时,要切记两点:drbd和drbd-kmdl的版本要对应;另一个是drbd-kmdl的版本要与当前系统的内核版本相对应。
安装包
drbd84-utils-8.9.1-1.el6.elrepo.x86_64.rpm
kmod-drbd84-8.4.5-504.1.el6.x86_64.rpm
node1:
[root@node1 ~]# rpm -ivh drbd84-utils-8.9.1-1.el6.elrepo.x86_64.rpm kmod-drbd84-8.4.5-504.1.el6.x86_64.rpm
node2:
root@node2 ~]# rpm -ivh drbd84-utils-8.9.1-1.el6.elrepo.x86_64.rpm kmod-drbd84-8.4.5-504.1.el6.x86_64.rpm
2、 查看安装生成的文件
------------------------------
[root@node1 ~]# rpm -ql drbd84-utils-8.9.1-1.el6.elrepo
....
/etc/drbd.conf        //配置文件
/etc/drbd.d
/etc/drbd.d/global_common.conf    //全局配置文件
.....
/sbin/drbdadm
/sbin/drbdmeta
/sbin/drbdsetup
/usr/lib/drbd
....
/usr/sbin/drbd-overview
/usr/sbin/drbdadm
/usr/sbin/drbdmeta
/usr/sbin/drbdsetup
/usr/share/cluster/drbd.metadata
/usr/share/cluster/drbd.sh
.....
/var/lib/drbd
[root@node1 ~]#
------------------------------
[root@node1 ~]# rpm -ql kmod-drbd84-8.4.5-504.1.el6.x86_64     //安装内核模块
/etc/depmod.d/kmod-drbd84.conf
/lib/modules/2.6.32-504.el6.x86_64
/lib/modules/2.6.32-504.el6.x86_64/extra
/lib/modules/2.6.32-504.el6.x86_64/extra/drbd84
/lib/modules/2.6.32-504.el6.x86_64/extra/drbd84/drbd.ko    //内核模块
....
[root@node1 ~]#
三、配置DRBD
1、配置文件介绍
drbd的主配置文件为/etc/drbd.conf;为了管理的便捷性,目前通常会将些配置文件分成多个部分,且都保存至/etc/drbd.d/目录中,主配置文件中仅使用"include"指令将这些配置文件片断整合起来。通常,/etc/drbd.d目录中的配置文件为global_common.conf和所有以.res结尾的文件。其中global_common.conf中主要定义global段和common段,而每一个.res的文件用于定义一个资源。
在配置文件中,global段仅能出现一次,且如果所有的配置信息都保存至同一个配置文件中而不分开为多个文件的话,global段必须位于配置文件的最开始处。目前global段中可以定义的参数仅有minor-count, dialog-refresh, disable-ip-verification和usage-count。
common段则用于定义被每一个资源默认继承的参数,可以在资源定义中使用的参数都可以在common段中定义。实际应用中,common段并非必须,但建议将多个资源共享的参数定义为common段中的参数以降低配置文件的复杂度。
resource段则用于定义drbd资源,每个资源通常定义在一个单独的位于/etc/drbd.d目录中的以.res结尾的文件中。资源在定义时必须为其命名,名字可以由非空白的ASCII字符组成。每一个资源段的定义中至少要包含两个host子段,以定义此资源关联至的节点,其它参数均可以从common段或drbd的默认中进行继承而无须定义。
/etc/drbd.conf
/etc/drbd.d/global_common.conf: 提供全局配置,及多个drbd设备相同的配置
/etc/drbd.d/*.res : 资源定义;
common:
*.res: 资源特有的配置
2、配置 /etc/drbd.d/global_common.conf
------------------
[root@node1 ~]# cat /etc/drbd.d/global_common.conf
---------------------
global {        //全局属性,定义drbd 自己的工作特性;
    usage-count no;        //此处更改为no,大意是用户体验之类的,反馈信息,
    # minor-count dialog-refresh disable-ip-verification
}
common {        //通用属性,定义多组drbd设备通用特性
    handlers {        //选择默认
        # These are EXAMPLE handlers only.
        # They may have severe implications,
        # like hard resetting the node under certain circumstances.
        # Be careful when chosing your poison.
        # pri-on-incon-degr "/usr/lib/drbd/notify-pri-on-incon-degr.sh; /usr/lib/drbd/notify-emergency-reboot.sh; echo b > /proc/sysrq-trigger ; reboot -f";
        # pri-lost-after-sb "/usr/lib/drbd/notify-pri-lost-after-sb.sh; /usr/lib/drbd/notify-emergency-reboot.sh; echo b > /proc/sysrq-trigger ; reboot -f";
        # local-io-error "/usr/lib/drbd/notify-io-error.sh; /usr/lib/drbd/notify-emergency-shutdown.sh; echo o > /proc/sysrq-trigger ; halt -f";
        # fence-peer "/usr/lib/drbd/crm-fence-peer.sh";
        # split-brain "/usr/lib/drbd/notify-split-brain.sh root";
        # out-of-sync "/usr/lib/drbd/notify-out-of-sync.sh root";
        # before-resync-target "/usr/lib/drbd/snapshot-resync-target-lvm.sh -p 15 -- -c 16k";
        # after-resync-target /usr/lib/drbd/unsnapshot-resync-target-lvm.sh;
    }
    startup {
        # wfc-timeout degr-wfc-timeout outdated-wfc-timeout wait-after-sb
    }
    options {
        # cpu-mask on-no-data-accessible
    }
    disk {
        on-io-error detach;        //此处添加一行 ,意为 一旦某个磁盘i/o发生错误 执行卸载
        # size on-io-error fencing disk-barrier disk-flushes
        # disk-drain md-flushes resync-rate resync-after al-extents
                # c-plan-ahead c-delay-target c-fill-target c-max-rate
                # c-min-rate disk-timeout
    }
    net {        //定义网络相关指令

        protocol C;
        cram-hmac-alg "sha1";        //消息校验时使用的算法
        shared-secret "iBtPDbodGmzDOKHTSa2h1g";        ////共享秘钥   建议使用随机生成数  {openssl rand -base64 16}
        # protocol timeout max-epoch-size max-buffers unplug-watermark
        # connect-int ping-int sndbuf-size rcvbuf-size ko-count
        # allow-two-primaries cram-hmac-alg shared-secret after-sb-0pri
        # after-sb-1pri after-sb-2pri always-asbp rr-conflict
        # ping-timeout data-integrity-alg tcp-cork on-congestion
        # congestion-fill congestion-extents csums-alg verify-alg
        # use-rle
    }
    syncer {        //定义同步速率
        rate  500M ;
    }
}

--------------------------------------------------
3、定义一个res资源,配置如下
[root@node1 drbd.d]# vim mystore.res
        resource mystore  {
          on node1.1inux.com {        //定义在哪一个节点上
            device    /dev/drbd0;    //定义设备文件名
            disk      /dev/sda3;    //定义用哪个分区磁盘设备当做drbd设备
            address   172.16.66.81:7789;        //当前节点监听的ip地址及端口
            meta-disk internal;        //定义源数据存放位置,internal表示磁盘自身
          }
          on node2.1inux.com {
            device    /dev/drbd0;
            disk      /dev/sda3;
            address   172.16.66.82:7789;
            meta-disk internal;
          }
        }
---------因为res中相同选项时公共的,因此-也可以如下定义-------------
resource mystore {
  device    /dev/drbd0;
  disk      /dev/sda3;
  meta-disk internal;

  on node1.1inux.com {
    address   172.16.66.81:7789;       //drbd  默认端口  7789
    }
  on node2.1inux.com {
    address   172.16.66.82:7789;
    }
}
------------------------------------------
以上文件在两个节点上必须相同,因此,可以基于ssh将刚才配置的文件全部同步至另外一个节点。
[root@node1 drbd.d]# scp /etc/drbd.d/* node2:/etc/drbd.d/
验证是否copy成功:
[root@node1 drbd.d]# ssh node2 "ls -l /etc/drbd.d/"
total 8
-rw-r--r-- 1 root root 2119 May 31 23:53 global_common.conf
-rw-r--r-- 1 root root  207 May 31 23:53 mystore.res
[root@node1 drbd.d]#
4、在两个节点上初始化已定义的资源并启动服务:
a)初始化资源,在Node1和Node2上分别执行:如图4
[root@node1 drbd.d]# drbdadm create-md mystore
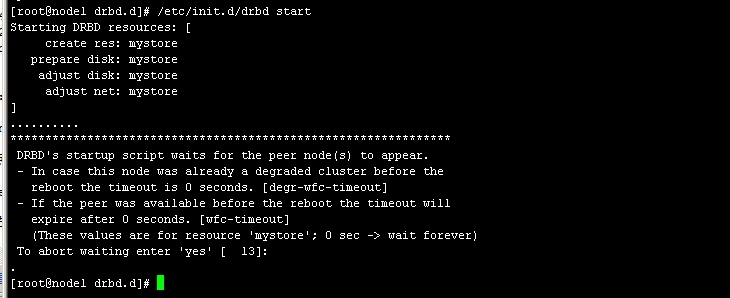
b)启动服务,在Node1和Node2上分别执行:如图5
/etc/init.d/drbd start
 c)可以使用一下两个命令查看资源状态 如图6
[root@node1 drbd.d]# cat /proc/drbd
[root@node1 drbd.d]# drbd-overview
------------- drbd-overview ------------------
0:mystore/0 Connected Secondary/Secondary Inconsistent/Inconsistent  从上面的信息中可以看出此时两个节点均处于Secondary状态。于是,我们接下来需要将其中一个节点设置为Primary。在要设置为Primary的节点上执行如下命令:
# drbdadm primary --force mystore
也可以使用一下命令,将当前节点设置为Primary
[root@node1 drbd.d]# drbdadm -- --overwrite-data-of-peer primary mystore
再次查看状态 如图7 ,发现节点已经有了主次
[root@node1 drbd.d]# drbd-overview
 0:mystore/0  Connected Primary/Secondary UpToDate/UpToDate
5、创建文件系统
注:文件系统的挂载只能在Primary节点进行,因此,也只有在设置了主节点后才能对drbd设备进行格式化:
[root@node1 ~]# mke2fs -j -L DRBD /dev/drbd0
创建挂载点并挂载之
[root@node1 ~]# mkdir /mnt/drbd
[root@node1 ~]# mount /dev/drbd0 /mnt/drbd
[root@node1 ~]#
查看:
[root@node1 ~]# mount
....
/dev/drbd0 on /mnt/drbd type ext3 (rw)    //已成功挂载
[root@node1 ~]#
6、切换Primary和Secondary节点
对主Primary/Secondary模型的drbd服务来讲,在某个时刻只能有一个节点为Primary,因此,要切换两个节点的角色,只能在先将原有的Primary节点设置为Secondary后,才能将原来的Secondary节点设置为Primary:
复制/etc/fstab 文件至/mnt/drbd 目录下
[root@node1 ~]# cp /etc/fstab /mnt/drbd/    //为了一会验证数据
[root@node1 ~]# ls /mnt/drbd/
fstab  lost+found
然后将node1 设置为secondary
[root@node1 ~]# umount /mnt/drbd        //注意设置为secondary之前应先将其卸载
[root@node1 ~]# drbdadm secondary mystore
[root@node1 ~]# drbd-overview
 0:mystore/0  Connected Secondary/Secondary UpToDate/UpToDate     //已经将为Secondary
[root@node1 ~]#
将node2 设置为Primary
[root@node2 drbd.d]# mkdir /mnt/drbd
[root@node2 drbd.d]# drbdadm primary mystore
[root@node2 drbd.d]# drbd-overview
 0:mystore/0  Connected Primary/Secondary UpToDate/UpToDate     //OK ,已经更改为Primary了
[root@node2 drbd.d]# mount /dev/drbd0 /mnt/drbd
[root@node2 drbd.d]# ls /mnt/drbd    //查看在node1上复制的文件是否还在
fstab  lost+found
[root@node2 drbd.d]#
OK DRBD的基本配置已经完成 接下来我们安装corosync
当一切正常后,设置不让drbd服务自动启动
[root@node1 ~]# chkconfig drbd off
[root@node2 ~]# chkconfig drbd off
四、安装配置 corosync 、pacemaker
1、按照corosync
在node1 上面安装:
[root@node1 ~]# yum -y install corosync pacemaker
在node2上安装
[root@node2 ~]# yum -y install corosync pacemaker
2、编辑配置文件
[root@node1 corosync]# cp corosync.conf.example corosync.conf
# vim corosync.conf
-------内容如下-----------------
# Please read the corosync.conf.5 manual page
compatibility: whitetank
totem {
    version: 2
    # secauth: Enable mutual node authentication. If you choose to
    # enable this ("on"), then do remember to create a shared
    # secret with "corosync-keygen".
    secauth: on
    threads: 0
    # interface: define at least one interface to communicate
    # over. If you define more than one interface stanza, you must
    # also set rrp_mode.
    interface {
                # Rings must be consecutively numbered, starting at 0.
        ringnumber: 0
        # This is normally the *network* address of the
        # interface to bind to. This ensures that you can use
        # identical instances of this configuration file
        # across all your cluster nodes, without having to
        # modify this option.
        bindnetaddr: 172.16.0.0
        # However, if you have multiple physical network
        # interfaces configured for the same subnet, then the
        # network address alone is not sufficient to identify
        # the interface Corosync should bind to. In that case,
        # configure the *host* address of the interface
        # instead:
        # bindnetaddr: 192.168.1.1
        # When selecting a multicast address, consider RFC
        # 2365 (which, among other things, specifies that
        # 239.255.x.x addresses are left to the discretion of
        # the network administrator). Do not reuse multicast
        # addresses across multiple Corosync clusters sharing
        # the same network.
        mcastaddr: 239.235.9.1
        # Corosync uses the port you specify here for UDP
        # messaging, and also the immediately preceding
        # port. Thus if you set this to 5405, Corosync sends
        # messages over UDP ports 5405 and 5404.
        mcastport: 5405
        # Time-to-live for cluster communication packets. The
        # number of hops (routers) that this ring will allow
        # itself to pass. Note that multicast routing must be
        # specifically enabled on most network routers.
        ttl: 1
    }
}
logging {
    # Log the source file and line where messages are being
    # generated. When in doubt, leave off. Potentially useful for
    # debugging.
    fileline: off
    # Log to standard error. When in doubt, set to no. Useful when
    # running in the foreground (when invoking "corosync -f")
    to_stderr: no
    # Log to a log file. When set to "no", the "logfile" option
    # must not be set.
    to_logfile: yes
    logfile: /var/log/cluster/corosync.log
    # Log to the system log daemon. When in doubt, set to yes.
    to_syslog: no
    # Log debug messages (very verbose). When in doubt, leave off.
    debug: off
    # Log messages with time stamps. When in doubt, set to on
    # (unless you are only logging to syslog, where double
    # timestamps can be annoying).
    timestamp: on
    logger_subsys {
        subsys: AMF
        debug: off
    }
}
service {
  ver:  0
  name: pacemaker
  use_mgmtd: yes
   }

aisexec {
  user: root
  group:  root
      }
------------------
3、生成corosync的密钥文件
[root@node1 corosync]# corosync-keygen
...
Press keys on your keyboard to generate entropy (bits = 1000).
Writing corosync key to /etc/corosync/authkey.
3、查看网卡是否开启了组播MULTICAST功能如果没有开启,要手动开启
[root@node1 corosync]# ip addr show
  1: lo: <LOOPBACK,UP,LOWER_UP> mtu 65536 qdisc noqueue state UNKNOWN
      link/loopback 00:00:00:00:00:00 brd 00:00:00:00:00:00
  2: eth0: <BROADCAST,MULTICAST,UP,LOWER_UP> mtu 1500 qdisc pfifo_fast state UP qlen 1000
      link/ether 00:0c:29:e6:82:77 brd ff:ff:ff:ff:ff:ff
[root@node1 corosync]#
4、将corosync.conf 和authkey复制到node2中
[root@node1 corosync]# scp authkey corosync.conf node2:/etc/corosync/
五、安装crmsh
RHEL自6.4起不再提供集群的命令行配置工具crmsh,转而使用pcs;所以如果想使用crmsh可以自行安装:
分别在node1和node2 上安装crmsh和pssh
下载:
crmsh-2.1-1.6.x86_64.rpm
pssh-2.3.1-2.el6.x86_64.rpm
[root@node1 ~]# yum --nogpgcheck localinstall crmsh-2.1-1.6.x86_64.rpm pssh-2.3.1-2.el6.x86_64.rpm
在node2上执行:
[root@node2 ~]# yum --nogpgcheck localinstall crmsh-2.1-1.6.x86_64.rpm pssh-2.3.1-2.el6.x86_64.rpm
六、验证corosync 、crmsh 是否安装成功
1、启动
[root@node1 ~]# service corosync start
Starting Corosync Cluster Engine (corosync):               [  OK  ]
2、查看端口
[root@node1 ~]# ss -tunl | grep :5405
udp    UNCONN     0      0           172.16.66.81:5405                  *:*
udp    UNCONN     0      0            239.235.9.1:5405                  *:*
[root@node1 ~]#
3、查看corosync引擎是否正常启动:
[root@node1 ~]# grep -e "Corosync Cluster Engine" -e "configuration file" /var/log/cluster/corosync.log
Jun 01 01:10:24 corosync [MAIN  ] Corosync Cluster Engine (‘1.4.7‘): started and ready to provide service.
Jun 01 01:10:24 corosync [MAIN  ] Successfully read main configuration file ‘/etc/corosync/corosync.conf‘.
4、查看初始化成员节点通知是否正常发出:
[root@node1 ~]# grep  TOTEM  /var/log/cluster/corosync.log
Jun 01 01:10:24 corosync [TOTEM ] Initializing transport (UDP/IP Multicast).
Jun 01 01:10:24 corosync [TOTEM ] Initializing transmit/receive security: libtomcrypt SOBER128/SHA1HMAC (mode 0).
Jun 01 01:10:24 corosync [TOTEM ] The network interface [172.16.66.81] is now up.
Jun 01 01:10:24 corosync [TOTEM ] A processor joined or left the membership and a new membership was formed.
5、检查启动过程中是否有错误产生。下面的错误信息表示packmaker不久之后将不再作为corosync的插件运行,因此,建议使用cman作为集群基础架构服务;此处可安全忽略。
[root@node1 ~]# grep ERROR: /var/log/cluster/corosync.log | grep -v unpack_resources
Jun 01 01:10:24 corosync [pcmk  ] ERROR: process_ais_conf: You have configured a cluster using the Pacemaker plugin for Corosync. The plugin is not supported in this environment and will be removed very soon.
Jun 01 01:10:24 corosync [pcmk  ] ERROR: process_ais_conf:  Please see Chapter 8 of ‘Clusters from Scratch‘ (http://www.clusterlabs.org/doc) for details on using Pacemaker with CMAN
Jun 01 01:10:25 corosync [pcmk  ] ERROR: pcmk_wait_dispatch: Child process mgmtd exited (pid=12572, rc=100)
[root@node1 ~]#
6、查看pacemaker是否正常启动:
[root@node1 ~]# grep pcmk_startup /var/log/cluster/corosync.log
Jun 01 01:10:24 corosync [pcmk  ] info: pcmk_startup: CRM: Initialized
Jun 01 01:10:24 corosync [pcmk  ] Logging: Initialized pcmk_startup
Jun 01 01:10:24 corosync [pcmk  ] info: pcmk_startup: Maximum core file size is: 18446744073709551615
Jun 01 01:10:24 corosync [pcmk  ] info: pcmk_startup: Service: 9
Jun 01 01:10:24 corosync [pcmk  ] info: pcmk_startup: Local hostname: node1.1inux.com
7、如果上面命令执行均没有问题,接着可以执行如下命令启动node2上的corosync
[root@node1 ~]# ssh node2 -- /etc/init.d/corosync start
Starting Corosync Cluster Engine (corosync): [  OK  ]
注意:启动node2需要在node1上使用如上命令进行,不要在node2节点上直接启动。下面是node1上的相关日志
[root@node1 ~]# tail /var/log/cluster/corosync.log
Jun 01 01:15:31 [12570] node1.1inux.com    pengine:     info: determine_online_status:     Node node2.1inux.com is online
Jun 01 01:15:31 [12570] node1.1inux.com    pengine:   notice: stage6:     Delaying fencing operations until there are resources to manage
Jun 01 01:15:31 [12570] node1.1inux.com    pengine:   notice: process_pe_message:     Calculated Transition 4: /var/lib/pacemaker/pengine/pe-input-4.bz2
Jun 01 01:15:31 [12570] node1.1inux.com    pengine:   notice: process_pe_message:     Configuration ERRORs found during PE processing.  Please run "crm_verify -L" to identify issues.
Jun 01 01:15:31 [12571] node1.1inux.com       crmd:     info: do_state_transition:     State transition S_POLICY_ENGINE -> S_TRANSITION_ENGINE [ input=I_PE_SUCCESS cause=C_IPC_MESSAGE origin=handle_response ]
Jun 01 01:15:31 [12571] node1.1inux.com       crmd:     info: do_te_invoke:     Processing graph 4 (ref=pe_calc-dc-1433092531-26) derived from /var/lib/pacemaker/pengine/pe-input-4.bz2
Jun 01 01:15:31 [12571] node1.1inux.com       crmd:   notice: run_graph:     Transition 4 (Complete=0, Pending=0, Fired=0, Skipped=0, Incomplete=0, Source=/var/lib/pacemaker/pengine/pe-input-4.bz2): Complete
Jun 01 01:15:31 [12571] node1.1inux.com       crmd:     info: do_log:     FSA: Input I_TE_SUCCESS from notify_crmd() received in state S_TRANSITION_ENGINE
Jun 01 01:15:31 [12571] node1.1inux.com       crmd:   notice: do_state_transition:     State transition S_TRANSITION_ENGINE -> S_IDLE [ input=I_TE_SUCCESS cause=C_FSA_INTERNAL origin=notify_crmd ]
Jun 01 01:15:36 [12566] node1.1inux.com        cib:     info: cib_process_ping:     Reporting our current digest to node1.1inux.com: 636b6119a291743253db7001ca171e0d for 0.5.8 (0x254d3a0 0)
查看集群节点的启动状态
[root@node1 ~]# crm status
Last updated: Mon Jun  1 01:17:57 2015
Last change: Mon Jun  1 01:15:26 2015
Stack: classic openais (with plugin)
Current DC: node1.1inux.com - partition with quorum
Version: 1.1.11-97629de
2 Nodes configured, 2 expected votes
0 Resources configured
Online: [ node1.1inux.com node2.1inux.com ]
[root@node1 ~]#
禁用stonith
[root@node1 ~]# crm configure property stonith-enabled=false
定义黏性值
[root@node1 ~]# crm configure property default-resource-stickiness=50
[root@node1 ~]# crm configure property no-quorum-policy=ignore
七、配置DRBD为集群服务
1、确保drbd服务不随开机启动,并且处于关闭状态
[root@node2 ~]# chkconfig drbd off
[root@node2 ~]# service drbd stop
Stopping all DRBD resources: .
[root@node2 ~]# drbd-overview
 0:mystore/0  Unconfigured . .
node1 操作同上
2、提供drbd的RA目前由OCF归类为linbit,其路径为/usr/lib/ocf/resource.d/linbit/drbd。我们可以使用如下命令来查看此RA及RA的meta信息:
# crm ra classes
heartbeat
lsb
ocf / heartbeat linbit pacemaker
stonith
# crm ra list ocf linbit
drbd
# crm ra info ocf:linbit:drbd
This resource agent manages a DRBD resource
as a master/slave resource. DRBD is a shared-nothing replicated storage
device. (ocf:linbit:drbd)
Master/Slave OCF Resource Agent for DRBD
Parameters (* denotes required, [] the default):
drbd_resource* (string): drbd resource name
 The name of the drbd resource from the drbd.conf file.
drbdconf (string, [/etc/drbd.conf]): Path to drbd.conf
 Full path to the drbd.conf file.
 .....
Operations‘ defaults (advisory minimum):
    start         timeout=240
    promote       timeout=90
    demote        timeout=90
    notify        timeout=90
    stop          timeout=100
    monitor_Slave timeout=20 interval=20
    monitor_Master timeout=20 interval=10
3、设置drbd为集群资源
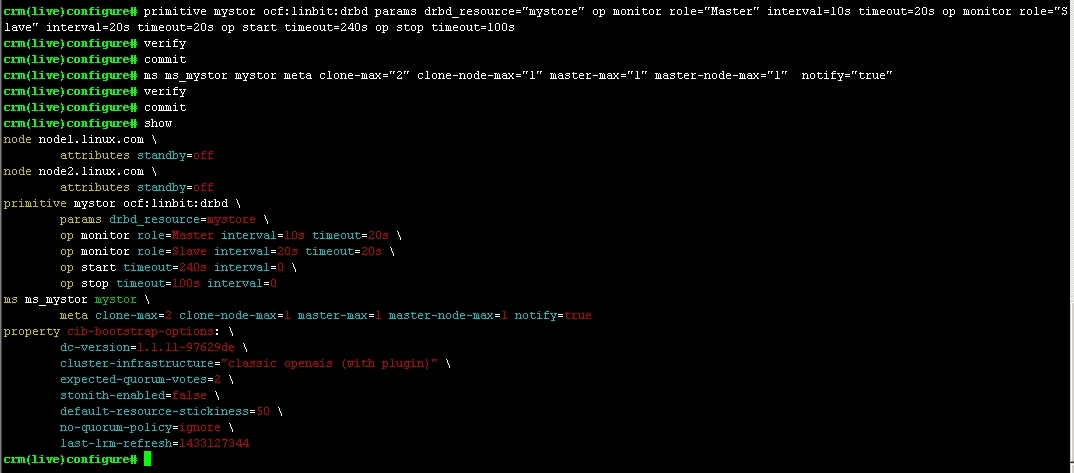
drbd需要同时运行在两个节点上,但只能有一个节点(primary/secondary模型)是Master,而另一个节点为Slave;因此,它是一种比较特殊的集群资源,其资源类型为多态(Multi-state)clone类型,即主机节点有Master和Slave之分,且要求服务刚启动时两个节点都处于slave状态。
configure# primitive mystor ocf:linbit:drbd params drbd_resource="mystore" op monitor role="Master" interval=10s timeout=20s op monitor role="Slave" interval=20s timeout=20s op start timeout=240s op stop timeout=100s
configure# ms ms_mystor mystor meta clone-max="2" clone-node-max="1" master-max="1" master-node-max="1" notify="true"
// 资源名: ms_mystor 、 源资源: mystor ; 属性: clone-max="2" clone-node-max="1" master-max="1" master-node-max="1"
图8 
4、查看状态:
# crm status
图9 
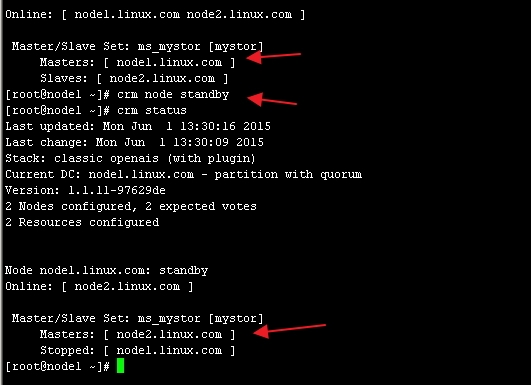
然后测试 让node1 下线,查看状态
# crm node standby
# crm status
如图10 
5、挂载文件系统
分别在node1和node2上创建挂载点
#mkdir /mydata
crm(live)configure# primitive mydata ocf:heartbeat:Filesystem params device="/dev/drbd0" directory="/mydata" fstype="ext4" op monitor interval=20s timeout=40s op start timeout=60s op stop timeout=60s
crm(live)configure# verify
crm(live)configure# commit
创建约束
crm(live)configure# colocation mydata_with_ms_mystor_master inf: mydata ms_mystor:Master
crm(live)configure# order mydata_after_ms_mystor_master Mandatory: ms_mystor:promote mydata:start
crm(live)configure# verify
crm(live)configure# commit
查看状态:
[root@node1 ~]# crm status
Last updated: Mon Jun  1 13:46:04 2015
Last change: Mon Jun  1 13:45:57 2015
Stack: classic openais (with plugin)
Current DC: node1.1inux.com - partition with quorum
Version: 1.1.11-97629de
2 Nodes configured, 2 expected votes
3 Resources configured
Online: [ node1.1inux.com node2.1inux.com ]
 Master/Slave Set: ms_mystor [mystor]
     Masters: [ node2.1inux.com ]
     Slaves: [ node1.1inux.com ]
 mydata    (ocf::heartbeat:Filesystem):    Started node2.1inux.com
[root@node1 ~]#
然后我们让node2 下线,再次查看状态
[root@node2 ~]# crm status
Last updated: Mon Jun  1 13:46:31 2015
Last change: Mon Jun  1 13:46:27 2015
Stack: classic openais (with plugin)
Current DC: node1.1inux.com - partition with quorum
Version: 1.1.11-97629de
2 Nodes configured, 2 expected votes
3 Resources configured
Node node2.1inux.com: standby
Online: [ node1.1inux.com ]
 Master/Slave Set: ms_mystor [mystor]
     Masters: [ node1.1inux.com ]
     Stopped: [ node2.1inux.com ]
 mydata    (ocf::heartbeat:Filesystem):    Started node1.1inux.com
[root@node2 ~]#
在node1上查看挂载点
如图11  OK 现在基于corosync的drbd已经可以自动切换了
八、安装mysql
1、创建mysql 用户 【以下步骤在node1上操作】
[root@node1 ~]# groupadd -g 306 mysql && useradd -r -g 306 -u 306  mysql
验证
[root@node1 ~]# grep mysql /etc/passwd
mysql:x:306:306::/home/mysql:/bin/bash
[root@node1 ~]#
2、创建目录,并更改属主、属组
[root@node1 ~]# mkdir /mydata/data
[root@node1 ~]# chown -R mysql:mysql /mydata/data
3、解压并配置MariaDB
[root@node1 ~]# tar xf mariadb-5.5.43-linux-x86_64.tar.gz -C /usr/local/
[root@node1 local]# ln -sv mariadb-5.5.43-linux-x86_64/ mysql
[root@node1 local]# cd mysql/
[root@node1 mysql]# chown -R root.mysql ./
[root@node1 local]# mkdir /etc/mysql
[root@node1 mysql]# cp support-files/my-large.cnf /etc/mysql/my.cnf
[root@node1 mysql]# vim /etc/mysql/my.cnf
----------------
thread_concurrency = 8
datadir = /mydata/data
innodb_file_per_table = on
skip_name_resolve = on
---------------------
[root@node1 mysql]# cp support-files/mysql.server /etc/rc.d/init.d/mysqld
[root@node1 mysql]# chmod +x /etc/rc.d/init.d/mysqld
[root@node1 mysql]# chkconfig --add mysqld
[root@node1 mysql]# chkconfig mysqld off
[root@node1 mysql]# echo "export PATH=/usr/local/mysql/bin:$PATH" > /etc/profile.d/mysql.sh
[root@node1 mysql]# . /etc/profile.d/mysql.sh
[root@node1 mysql]# ln -sv /usr/local/mysql/include/ /usr/include/mysql
[root@node1 mysql]# vim /etc/man.config
添加以下内容:
MANPATH /usr/local/mysql/man
启动MariaDB
[root@node2 mysql]# service mysqld start
Starting MySQL....                                         [  OK  ]
[root@node2 mysql]#
4、初始化数据库:
[root@node1 mysql]# ./scripts/mysql_install_db --user=mysql --datadir=/mydata/data
5、验证数据库是否初始化成功
如图12 6、登陆并创建数据库,如图13
MariaDB [(none)]> GRANT ALL ON *.* TO "root"@"172.16.%.%" IDENTIFIED BY ‘1inux‘;
MariaDB [(none)]> FLUSH PRIVILEGES;
完成后退出数据库,并下线node1,然后再node2上执行步骤1, 步骤3
完成后,在node2节点上连接数据库,并查看,如图14 ,在可以看到node1上创建的1inux数据库
图14 
退出mysql,并停止mysqld服务
#service mysqld stop
#crm node syandby
# crm node online
九、把MariaDB定义成高可用集群的资源
crm(live)configure# primitive myip ocf:heartbeat:IPaddr params ip="172.16.66.88" op monitor interval=10s timeout=20s
crm(live)configure# primitive myserver lsb:mysqld op monitor interval=20s timeout=20s
crm(live)configure# verify
crm(live)configure# commit
crm(live)configure# colocation myip_with_ms_mystor_master inf: myip ms_mystor:Master
crm(live)configure# colocation myserver_with_mydata inf: myserver mydata
crm(live)configure# order myserver_after_mydata Mandatory: mydata:start myserver:start
crm(live)configure# order myserver_after_myip Mandatory: myip:start myserver:start
crm(live)configure# verify
crm(live)configure# commit
crm(live)configure# show
----------------
node node1.1inux.com         attributes standby=off
node node2.1inux.com         attributes standby=off
primitive mydata Filesystem         params device="/dev/drbd0" directory="/mydata" fstype=ext4         op monitor interval=20s timeout=40s         op start timeout=60s interval=0         op stop timeout=60s interval=0
primitive myip IPaddr         params ip=172.16.66.88         op monitor interval=10s timeout=20s
primitive myserver lsb:mysqld         op monitor interval=20s timeout=20s
primitive mystor ocf:linbit:drbd         params drbd_resource=mystore         op monitor role=Master interval=10s timeout=20s         op monitor role=Slave interval=20s timeout=20s         op start timeout=240s interval=0         op stop timeout=100s interval=0
ms ms_mystor mystor         meta clone-max=2 clone-node-max=1 master-max=1 master-node-max=1 notify=true
colocation mydata_with_ms_mystor_master inf: mydata ms_mystor:Master
colocation myip_with_ms_mystor_master inf: myip ms_mystor:Master
colocation myserver_with_mydata inf: myserver mydata
order mydata_after_ms_mystor_master Mandatory: ms_mystor:promote mydata:start
order myserver_after_mydata Mandatory: mydata:start myserver:start
order myserver_after_myip Mandatory: myip:start myserver:start
property cib-bootstrap-options:         dc-version=1.1.11-97629de         cluster-infrastructure="classic openais (with plugin)"         expected-quorum-votes=2         stonith-enabled=false         default-resource-stickiness=50         no-quorum-policy=ignore         last-lrm-refresh=1433127344
OK 基于corosync的 drbd高可用mysql 已经搭建完成
========试验中错误信息及解决方案============================
查看HA 状态信息
[root@node2 ~]# crm status
Last updated: Mon Jun  1 10:57:16 2015
Last change: Mon Jun  1 10:55:44 2015
Stack: classic openais (with plugin)
Current DC: node1.1inux.com - partition with quorum
Version: 1.1.11-97629de
2 Nodes configured, 2 expected votes
1 Resources configured
Online: [ node1.1inux.com node2.1inux.com ]
 mystor    (ocf::linbit:drbd):    FAILED (unmanaged) [ node1.1inux.com node2.1inux.com ]
Failed actions:
    mystor_stop_0 on node1.1inux.com ‘not configured‘ (6): call=12, status=complete, last-rc-change=‘Mon Jun  1 10:55:44 2015‘, queued=0ms, exec=21ms
    mystor_stop_0 on node1.1inux.com ‘not configured‘ (6): call=12, status=complete, last-rc-change=‘Mon Jun  1 10:55:44 2015‘, queued=0ms, exec=21ms
    mystor_monitor_0 on node2.1inux.com ‘not configured‘ (6): call=5, status=complete, last-rc-change=‘Mon Jun  1 10:57:08 2015‘, queued=0ms, exec=46ms
    mystor_monitor_0 on node2.1inux.com ‘not configured‘ (6): call=5, status=complete, last-rc-change=‘Mon Jun  1 10:57:08 2015‘, queued=0ms, exec=46ms
[root@node2 ~]#
删除资源
[root@node1 ~]# crm resource stop mystor
[root@node1 ~]# crm configure delete mystor
ERROR: resource mystor is running, can‘t delete it
显示无法删除
重启corosync试试
重启之前先清除一下节点状态 【注 在node1 与node2 上都要清除并重启 】
[root@node2 ~]# crm node clearstate node2.1inux.com
Do you really want to drop state for node node2.1inux.com (y/n)? y
[root@node2 ~]#
[root@node2 ~]# service corosync restart
Signaling Corosync Cluster Engine (corosync) to terminate: [  OK  ]
Waiting for corosync services to unload:...................[  OK  ]..................................................................
Starting Corosync Cluster Engine (corosync):               [  OK  ]
[root@node2 ~]#
[root@node2 ~]# crm status
Last updated: Mon Jun  1 11:34:15 2015
Last change: Mon Jun  1 11:32:02 2015
Stack: classic openais (with plugin)
Current DC: NONE
2 Nodes configured, 2 expected votes
1 Resources configured
OFFLINE: [ node1.1inux.com node2.1inux.com ]
重启后尝试删除节点 :
[root@node2 ~]# crm configure delete mystor        //OK 删除成功
[root@node2 ~]#
接下来就可以重新配置了
本文出自 “无常” 博客,请务必保留此出处http://1inux.blog.51cto.com/10037358/1659062
郑重声明:本站内容如果来自互联网及其他传播媒体,其版权均属原媒体及文章作者所有。转载目的在于传递更多信息及用于网络分享,并不代表本站赞同其观点和对其真实性负责,也不构成任何其他建议。


