linux文件共享之nfs和smaba
nfs和samba
1、NFS简介
NFS(Network File System)即网络文件系统,是FreeBSD支持的文件系统中的一种,它允许网络中的计算机之间通过TCP/IP网络共享资源。在NFS的应用中,本地NFS的客户端应用可以透明地读写位于远端NFS服务器上的文件,就像访问本地文件一样。
类unix系统之间实现文件共享功能,不能实现跟windows系统之间实现共享;
2、NFS工作过程:
nfs依赖于rpc服务才能工作;
nfs工作过程:nfs客户端/nfs服务端
1、nfs服务端,在本地分区上创建一个extX的文件系统,并将该分区挂载至一个空目录上,注意,此时在服务端,文件系统是extX;
2、nfs服务端,上有个nfs协议,他的目的是,监听服务端套接字,接入用户关于nfs协议的请求,去帮忙访问本地基于extX文件系统的目录数据;
3、nfs客户端也是利用nfs协议。当有用户访问关于远程nfs服务端数据时,其实是启用nfs协议利用rpc的远程过程调用,去调用nfs服务端的extX文件系统的分区目录数据;
注意:nfs客户端能够直接操作本地映射的关于nfs服务器上的资源,是通过客户端利用vfs文件系统转换成nfs结合rpc的远程过程调用来完成的;
nfs服务端,监听关于nfs协议的rpc套接字,将用户请求的资源直接映射到本地的其他文件系统的资源目录中;
nfs客户端其实是通过nfs协议+rpc的远程过程调用去访问远程nfs服务端资源的。资源并不是指nfs文件系统格式的资源。他只是一个协议;
先由rpc监听111端口,再转到nfs的2049端口;
3、NFS安装:
nfs程序包:nfs-utils
[root@localhost ~]# yum -y install nfs-utils :安装nfs服务;
[root@localhost ~]# yum -y install rpcbind :安装rpc服务;
[root@localhost ~]# service nfs start
启动 NFS 服务: [确定]
关掉 NFS 配额: [确定]
启动 NFS mountd: [确定]
启动 NFS 守护进程: [确定]
正在启动 RPC idmapd: [确定]
[root@localhost ~]# service nfs status
rpc.svcgssd 已停
rpc.mountd (pid 2200) 正在运行...
nfsd (pid 2215 2214 2213 2212 2211 2210 2209 2208) 正在运行...
rpc.rquotad (pid 2196) 正在运行...
[root@localhost ~]# :安装和启用nfs服务;
[root@localhost ~]# rpcinfo -p localhost :查看nfs启用了哪些进程,及进程端口号;
4、配置和使用nfs:
nfs服务端配置:
共享方式:
在服务端上将共享目录导出到nfs共享目录,然后配置权限,客户端就能访问了;
nfs共享目录的配置格式:
文件系统 客户端1(文件系统属性) 客户端2(文件系统属性)
文件系统:要共享的目录;
客户端:
主机地址。1.1.1.1;
网络名,test.aaa.com;
网段地址,1.1.1.0/24;
文件系统属性:也叫共享权限,多个属性用逗号分开;
rw:读写;
asvnc:异步(默认);
sync:同步(性能差);
root_squash:压缩root用户(默认)。如果使用客户端root去访问服务端nfs共享时,则需要基于imapd,自动将root通过网络访问时转换为nfsnobody用户(guest账户);
注意:guest用户的权限是很小的,压缩很安全;
no_root_squash:不压缩root用户(不安全);
注意:root可以直接使用自身去访问nfs共享目录了,权限无限制;
all_squash:压缩所有用户。客户端所有用户都不能使用自己的什么去访问服务端上的共享目录(“不能拿自己家的钥匙去开别人家的门”)。提高服务端安全;
anonuid或anongid:指定匿名用户映射为系统上的UID和GID。默认是映射到nfsnobody这个guest账号上来。提高服务端安全;
id nfsnobody :查看guest账号的uid和gid
nohide:隐藏交叉导出时的目录文件,允许交叉挂载;
例如:/var/nfstest/ 导出来,被客户端挂载了。/var/nfstest/a/导出来,也被客户端挂在了。现在不想让双方客户端看到对方的挂载目录下的文件,怎么办?就是设置nohide属性,挂载到/var/nfstest/下的客户端无法看到/var/nfstest/a/下的所有文件了。安全;
crossmnt:允许交叉挂载。意义同上反过来;
示例1:将NFS服务器上的目录/var/nfstest共享出去;
[root@localhost ~]# vim /etc/exports
/var/nfstest 172.16.0.0/16(rw,no_root_squash) :读写挂载,且不压缩root账户
[root@localhost ~]# mkdir /var/nfstest
[root@localhost ~]# service nfs restart
客户端操作:
[root@localhost ~]# mkdir /mnt/nfs
[root@localhost ~]# mount -t nfs 172.16.1.107:/var/nfstest /mnt/nfs
[root@localhost ~]# cd /mnt/nfs/
[root@localhost nfs]# touch aa.txt
[root@localhost nfs]# touch bb.txt
[root@localhost nfs]# ll
总用量 0
-rw-r--r--. 1 root root 0 4月 4 21:19 aa.txt
-rw-r--r--. 1 root root 0 4月 4 21:19 bb.txt
[root@localhost nfs]#
:客户端使用挂载的方式,来访问nfs服务端上的文件内容,二者内容是同步的;
示例2:文件共享权限:
场景:在nfs服务端上各自创建一个账号,且uid一样。观察相互在共享目录下创建文件后,各自看到的文件属主和属组;
nfs服务端:
[root@localhost ~]# useradd -u 502 hadoop
[root@localhost ~]# vim /etc/exports
/var/nfstest 172.16.0.0/16(rw,no_root_squash)
[root@localhost ~]# setfacl -m u:502:rwx /var/nfstest/ :为hadoop账号设置访问共享目录的权限;
[root@localhost ~]# service nfs restart
nfs客户端:
[root@localhost /]# useradd -u 502 nfsuser
[root@localhost /]# mount -t nfs 172.16.1.107:/var/nfstest /mnt/nfs/
[root@localhost /]# :客户端上创建同uid的账号:
[root@localhost /]# su - nfsuser
[nfsuser@localhost ~]$
[nfsuser@localhost ~]$
[nfsuser@localhost ~]$ cd /mnt/nfs/
[nfsuser@localhost nfs]$ touch test1.txt
[nfsuser@localhost nfs]$ touch test2.txt
[nfsuser@localhost nfs]$ ll
总用量 0
-rw-r--r--. 1 root root 0 4月 4 21:19 aa.txt
-rw-r--r--. 1 root root 0 4月 4 21:19 bb.txt
-rw-rw-r--. 1 nobody nobody 0 4月 4 21:28 test1.txt
-rw-rw-r--. 1 nobody nobody 0 4月 4 21:28 test2.txt
[nfsuser@localhost nfs]$ :使用新建的账号去共享目录中创建两个文件;
发现:使用这个uid编号跟服务端uid编号一样的用户去创建文件是的属主和属组都是nobody,并不是自己;
[root@localhost ~]# useradd -u 509 aaa
[root@localhost ~]# su - aaa
[aaa@localhost ~]$ cd /mnt/nfs/
[aaa@localhost nfs]$ touch ttt.txt
touch: 无法创建"ttt.txt": 权限不够
[aaa@localhost nfs]$
发现:当我在客户端上重新再创建一个用户时,切换到该用户,去共享目录下新建文件,提示权限不够;
来到nfs服务端:
[root@localhost ~]# cd /var/nfstest/
[root@localhost nfstest]# ll
总用量 0
-rw-r--r--. 1 root root 0 4月 4 21:19 aa.txt
-rw-r--r--. 1 root root 0 4月 4 21:19 bb.txt
-rw-rw-r--. 1 hadoop hadoop 0 4月 4 21:28 test1.txt
-rw-rw-r--. 1 hadoop hadoop 0 4月 4 21:28 test2.txt
[root@localhost nfstest]#
发现:原本在客户端上创建的文件的属主和属组变成了hadoop了;
权限总结:
1、nfs客户端用户在访问时,其实是映射到服务端上同uid的用户权限上了;
2、服务端同uid用户的权限就是客户端用户的权限;
3、共享目录的权限是文件系统跟nfs配置权限的交集;
4、客户端用户在共享目录下创建的文件统统都会显示成nobody用户;
因此,客户端用户要想在共享目录中有权限,需要两点儿:
1、客户端上用户的uid编号在服务端上必须也有;
2、服务端同uid账号的对共享目录拥有权限;
5、nfs服务端端口优化:
问题:nfs服务端启动后,基于rpc的进程会从rpc中随机得到一个端口号,次端口号有可能会被其他已知服务占用。因此要固定下来;
[root@localhost nfstest]# vim /etc/sysconfig/nfs
MOUNTD_PORT=892
STATD_PORT=662
STATD_OUTGOING_PORT=2020 :去掉这些原有的注释,启用固定端口;
[root@localhost nfstest]# service nfs restart
[root@localhost nfstest]# rpcinfo -p localhost :查看被gudingde端口号;
结束!
2、Samba简介:
Samba是在Linux和UNIX系统上实现SMB协议的一个免费软件,由服务器及客户端程序构成。SMB(Server Messages Block,信息服务块)是一种在局域网上共享文件和打印机的一种通信协议,它为局域网内的不同计算机之间提供文件及打印机等资源的共享服务。SMB协议是客户机/服务器型协议,客户机通过该协议可以访问服务器上的共享文件系统、打印机及其他资源。通过设置“NetBIOS over TCP/IP”使得Samba不但能与局域网络主机分享资源,还能与全世界的电脑分享资源。
可以实现linux与windows,linux与linux系统之间的文件共享。不基于nfs;
1、samba安装:
客户端程序:samba-client;
服务器端程序:samba;
[root@localhost ~]# yum -y install samba
[root@localhost samba]# service smb start
启动 SMB 服务: [确定]
[root@localhost samba]# service nmb start
启动 NMB 服务: [确定]
[root@localhost samba]# :启动samba服务;
2、samba用户:
在系统用户的基础之上,为该用户创建访问samba服务de密码即可;
3、samba服务的配置文件:
vim /etc/samba/smb.conf
#开头的都是纯文字注释信息;
;开头的都是可启用的注释选项;
workgroup = :工作组名称;
server string = :显示的samba服务器版本;
netbios name = :netbios的名称;
interfaces = :表示samba启用的监听接口;
hosts allow = :表示访问控制白名单。允许哪些段的主机访问;
注意:如果启用了,没写到这里的都会拒绝掉。因为它是白名单。没写入白名单的都拒绝;
log file = :日志文件位置。%m:宏,表示客户端名称。所以,每个客户端都会生成一个日志文件;
max log size = :日志文件最大大小;
security = :安全级别(默认);
user:根据账号密码认证;
share:无需账号密码,直接访问;
server:集中式账号密码;
passdb backend = :账号密码的存放格式。默认是tdbsam;
域:
sercurity = domain :这是域下的安全级别,domain;
passdb backend = :账号密码存放格式;
password server = :域认证服务器名;
名称解析选项:wins是windows的本地名称解析服务;
wins support = :是否启用wins;
wins server = :wins服务器;
wins proxy = :wins的代理;
dns proxy =
打印机选项:共享打印机
load printers = :加载打印服务;
文件系统选项;
........
[共享名] :共享名;
comment = :共享备注信息;
path = :实际共享目录路径;
guest ok = :是否允许来宾账号查看某些目录;
public = :登录samba的用户不是某些共享目录的属主和属组时,是否允许浏览和显示;
browseable = :登录samba的用户不是当前共享目录的属主和属组时,是否允许浏览和显示
也就是说,一个目录在共享目录下,当用户不属于我的属主和属组时,当该用户访问时,我是否显示出来。最好别显示,为了安全;
writable = :是否启用共享可写权限。针对全部访问者;
write list = :共享可写用户列表。只针对该列表中的用户;
read only = :是否允许只读。定义了只读,则write list和writable=yes就没有意义了;
示例1:我为samba服务器端创建用户,提供文件共享:
[root@localhost ~]# smbpasswd -a centos
New SMB password:
Retype new SMB password:
Added user centos.
[root@localhost ~]#
[root@localhost ~]# smbpasswd -a hadoop
New SMB password:
Retype new SMB password:
Added user hadoop.
[root@localhost ~]# service smb restart
关闭 SMB 服务: [确定]
启动 SMB 服务: [确定]
[root@localhost ~]# service nmb restart
关闭 NMB 服务: [确定]
启动 NMB 服务: [确定]
[root@localhost ~]# :重启samba服务;
验证上面创建的用户是否能够登录samba服务端:
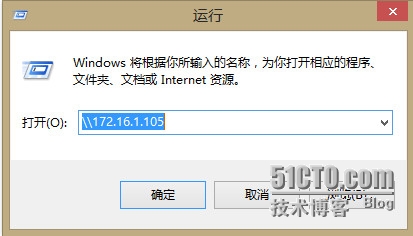
在windows是上使用unc的方式访问:
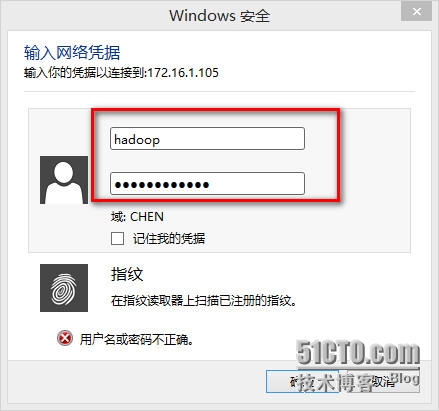
输入hadoop的用户名和密码,成功访问到samba中的共享目录:其实访问的是用户自己的家目录;

示例2:基于用户控制,访问公共共享目录;
[root@localhost ~]# mkdir /share/test -pv
mkdir: 已创建目录 "/share"
mkdir: 已创建目录 "/share/test"
[root@localhost ~]# setfacl -m u:centos:rwx /share/test/
[root@localhost ~]# vim /etc/samba/smb.conf
[myshared]
comment = my share test
path = /share/test
writable = yes :添加共享记录,将目录共享出去;
[root@localhost ~]# testparm :检测一下配置文件中的内容;
[root@localhost ~]# service smb restart
关闭 SMB 服务: [确定]
启动 SMB 服务: [确定]
[root@localhost ~]# service nmb restart
关闭 NMB 服务: [确定]
启动 NMB 服务: [确定]
[root@localhost ~]# :重启一下samba服务;
使用客户端去测试:
使用centos帐号去测试:
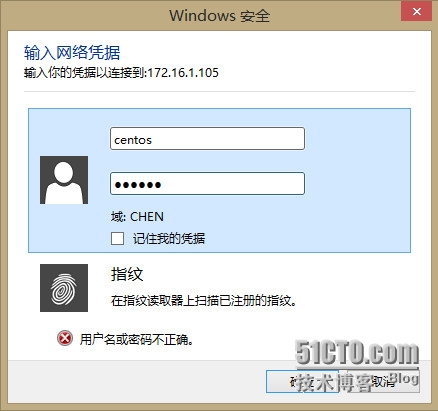
可以看到,能够显示新建的共享目录了。因为设置了文件acl,使得centos账户可以访问这个目录:

可以新建文件:

再次使用hadoop登录查看:
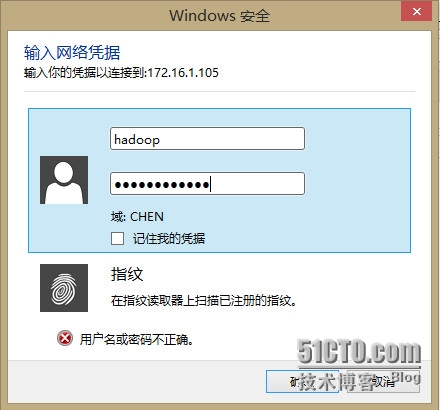
ok,都能看到新建的共享目录了:
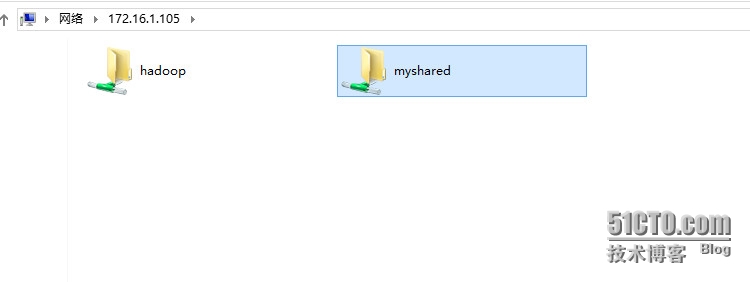
但是hadoop却没权限使用该共享目录;
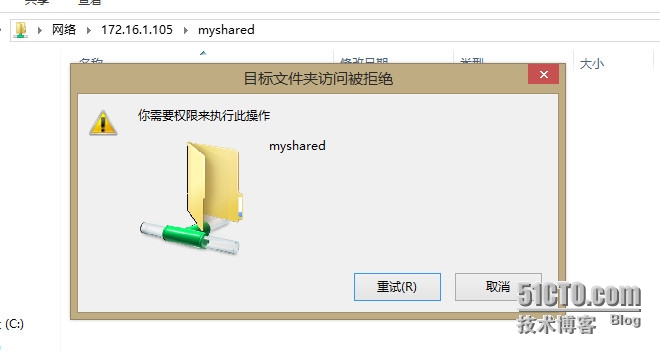
注意:共享文件的最终权限取决于文件系统和共享权限二者的交集;
提醒:
基于windows客户端去访问共享时,由于缓存的原因,可能导致有时不能更换账号,可以如下解决:
cmd
net use
net use \\共享服务器ip /del :清楚共享账号缓存;
4、smbclient命令:一种使用在samba客户端上的命令:
1、查看samba服务器上的所有共享目录:
格式:smbclient -L SERVER -U USERNAME
例如:
[root@localhost ~]# smbclient -L 172.16.1.105 -U hadoop
Enter hadoop‘s password:
Domain=[MYGROUP] OS=[Unix] Server=[Samba 3.6.23-14.el6_6]
Sharename Type Comment
--------- ---- -------
myshared Disk my share test
IPC$ IPC IPC Service (Samba Server Version 3.6.23-14.el6_6)
hadoop Disk Home Directories
Domain=[MYGROUP] OS=[Unix] Server=[Samba 3.6.23-14.el6_6]
Server Comment
--------- -------
LOCALHOST Samba Server Version 3.6.23-14.el6_6
Workgroup Master
--------- -------
MYGROUP LOCALHOST
WORKGROUP CHEN
[root@localhost ~]# :可以看到刚刚新建的共享目录了;
2、以交互式的方式连入samba服务器共享目录:
格式:smbclient //SERVER/SHARED -U USERNAME
如:
[root@localhost ~]# smbclient //172.16.1.105/myshared -U centos
Enter centos‘s password:
Domain=[MYGROUP] OS=[Unix] Server=[Samba 3.6.23-14.el6_6]
smb: \> ls :输入命令,去操作共享目录中的内容;
5、挂载共享目录至客户端本地:
1、临时挂载:
格式:mount -t cifs //server/shared /path/to/mount_point -o username=smbuser
[root@localhost ~]# mkdir /mnt/samba
[root@localhost ~]# mount -t cifs //172.16.1.105/myshared /mnt/samba -o username=centos
Password:
[root@localhost samba]# ll
总用量 0
-rwxr--r--. 1 centos centos 0 4月 5 04:39 新建文本文档.txt
[root@localhost samba]# :临时执行一次手动挂载;
2、开机自动挂载:
vim /etc/fstab
//172.16.1.105/myshared /mnt/samba cifs defaults,_netdev,username=centos,password=password2020 [root@localhost /]# mount -a :重载/etc/fstab文件;
[root@localhost /]#
[root@localhost /]# mount
/dev/mapper/VolGroup-lv_root on / type ext4 (rw)
proc on /proc type proc (rw)
sysfs on /sys type sysfs (rw)
devpts on /dev/pts type devpts (rw,gid=5,mode=620)
tmpfs on /dev/shm type tmpfs (rw,rootcontext="system_u:object_r:tmpfs_t:s0")
/dev/sda1 on /boot type ext4 (rw)
none on /proc/sys/fs/binfmt_misc type binfmt_misc (rw)
//172.16.1.105/myshared on /mnt/samba type cifs (rw) :可以看到,成功被挂载了;
注意:/etc/fstab中有个参数:“_netdev”:表示当无法挂载时放弃挂载。因为共享是基于网络的,当无法挂载时,服务器是无法开机的。所以,要主动放弃;
[root@localhost /]# cd /mnt/sa——mba/
[root@localhost samba]#
[root@localhost samba]# ll
总用量 0
-rwxr--r--. 1 centos centos 0 4月 5 04:39 新建文本文档.txt
[root@localhost samba]# :挂载成功;
6、web方式管理配置samba:
[root@localhost /]# yum -y install samba-swat xinetd :安装samba-swat和xinetd服务;
[root@localhost /]# vim /etc/xinetd.d/swat
port = 901 :端口号默认901;
only_from = 172.16.0.0/16 :修改客户端限制;
disable = no :修改此处为“no”;
[root@localhost /]# service xinetd start
正在启动 xinetd:
[root@localhost /]# chkconfig | grep swat
swat: 启用 :启用samba-swat;
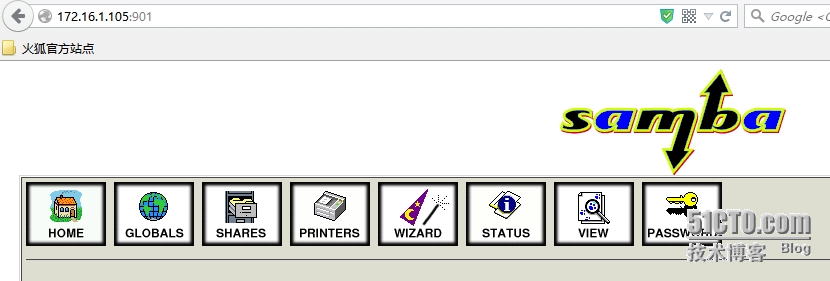
web访问配置:成功访问,可以执行配置了;
结束!
本文出自 “linux运维集锦” 博客,请务必保留此出处http://5200linux.blog.51cto.com/6012970/1628986
郑重声明:本站内容如果来自互联网及其他传播媒体,其版权均属原媒体及文章作者所有。转载目的在于传递更多信息及用于网络分享,并不代表本站赞同其观点和对其真实性负责,也不构成任何其他建议。


