Blender源码在Mac OS X上的编译(英)
Install Xcode Development Tools
It is recommended to download the newest Xcode package from the Mac App Store for your system (it‘s free).
For Xcode 4, you need to install the command line tools additionally. This is done by starting Xcode, going into Preferences.. > Download and installing them. For Xcode 5 this should no longer be needed.
Install CMake
CMake is a tool for generating build environments and it supports make and Xcode (among others). Download CMake here.
If you plan to build using SCons, then you can skip this step.
Download sources from Git
Now you are ready to get the latest Blender source code from Blender.org‘s Git repository. Copy and paste the following instructions into a terminal window. These will create a blender-build folder off your home directory and download the latest source code.
mkdir ~/blender-build
cd ~/blender-build
git clone http://git.blender.org/blender.git
cd blendergit submodule update --init --recursive
git submodule foreach git checkout master
git submodule foreach git pull --rebase origin master
For additional information on using Git with Blender‘s sources, see: Tools/Git
Download external libraries from Subversion
The external libraries needed for building blender have been precompiled for Intel 32 bit and 64 bit and OS X 10.5+, and can be download with these commands:
cd ~/blender-build
mkdir lib
cd lib
svn checkout https://svn.blender.org/svnroot/bf-blender/trunk/lib/darwin-9.x.universal
Updating sources and external libraries
If you later want to update your git and svn checkout to the latest version:
cd ~/blender-build/blender
git pull --rebase
git submodule foreach git pull --rebase origin master

cd ~/blender-build/lib/darwin-9.x.universal
svn update
Run CMake To Create makefiles and XCode Project
CMake itself does not build blender, but it generates the build environment for Blender. You can either generate Unix Makefiles that can be used from the terminal (easy), or generate XCode Project Files if you like to work in XCode.
Quick Build with a Single Command
The easiest and fastest solution is to build Blender with the default settings, and simply run this in the Terminal:
cd ~/blender-build/blender
make
After the build finished, you will find blender.app ready to run in ~/blender-build/build_darwin/bin.
Read on if you want to do more advanced configuration.
Configure a New Build with CMake GUI
Note: For CMake to determine the proper location of Xcode build, it‘s important that your active version of Xcode be located at /Applications/Xcode.app.
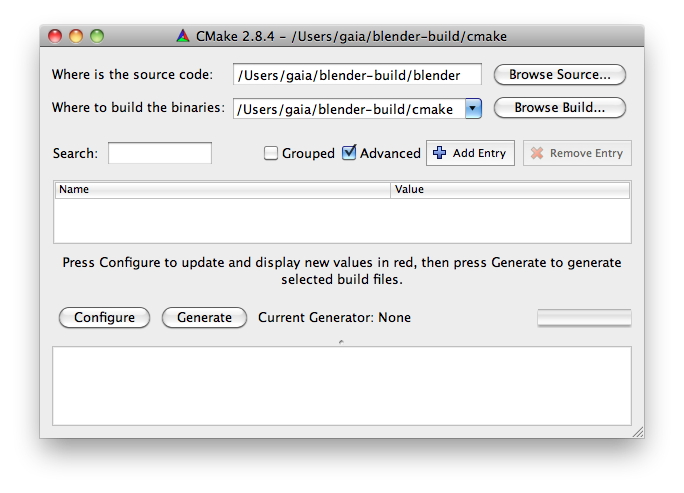
CMake comes with a command line interface as well as a the graphical user interface. Skip to the next section if you want to use Terminal only. You find the CMake App in your Application folder. Double click on it to start it. The CMake Window shows up:
As you can see all you have to enter is the location of the sources in ~blender-build/blender and a destination directory which i have chosen to be ~blender-build/cmake (any location outside of the source directory is allowed).
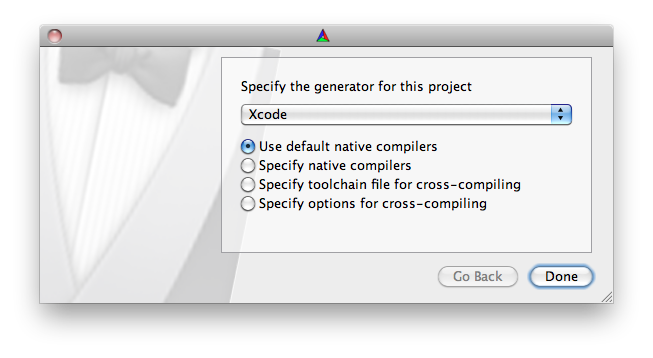
Now Press the "Configure" Button. You get another Popup:
Here you can select which Generator you want to use (Unix Makefiles or CMake in our case). I have selected Xcode here. Note that you also can select which compiler you want to use. If you are unsure about what that means, don‘t worry and use the default native compilers.
Now press the "Done" Button. You get back to the previous screen but now you will see a big red list of options. You can scroll through the option list and set parameters to your needs. Please ensure that the following settings are correct for your build:
| parameter | value |
|---|---|
| CMAKE_BUILD_TYPE | "Release" (for release build with optimizations) or "Debug" (to get debug info for gdb) |
| CMAKE_OSX_ARCHITECTURES | ppc, i386, x86_64 (x86_64 for all recent OS X versions) Note: x86_64 (64 bits) is default, only newer hardware support it. If your build stops with error "Bad CPU type in executable" you have to switch cpu type to i386 or ppc (32 bits). |
| CMAKE_OSX_DEPLOYMENT_TARGET | You can restrict the OSX version you want to build for (10.5, 10.6, 10.7, 10.8, 10.9), but a nice default is 10.6. |
| CMAKE_OSX_SYSROOT | It is recommended to always use the highest sdk available. |
| WITH_CODEC_QUICKTIME | must be set to ON if you want to use Apple media services ( actual QTKit, AVKit soon ) |
| WITH_CODEC_FFMPEG | set to ON if you want FFMPEG support. |
| CMAKE_CXX_FLAGS_DEBUG, CMAKE_C_FLAGS_DEBUG | (advanced mode) set to "-g3 -O0 -fno-inline" for best gdb code stepping |
Note: ‘gcc‘ is a symbolic link to the default compiler used by the desired Xcode version. Since XCode5 this means CLANG, formerly it was llvm-gcc
Click Configure again and the red highlighting should disappear. Then click Generate and your build environment will be created into the build folder.
The next steps depend on the type of build files you generated.
Configuring a New Build From With CMake From the Command Line
cd to the directory where the blender/ and lib/ directories are. Then do the following:
mkdir build_darwin
cd build_darwin
cmake ../blender/
This will create all Makefiles in the cmake directory, as an "out of source build"
Then run
ccmake .
Which starts the terminal ‘curses‘ app to configure build settings. Check the section above for important settings. End with the commands "c" (configure) and "g" (generate). Note that you have to carefully check cpu type and OSX version.
Building Blender
At this point you should have your build environment set up via CMake. Now you can build the actual executable in two different way: From the Command Line with Make, or With XCode.
Build with Unix Makefiles
Open up a Terminal and navigate to the build directory you created (e.g. build_darwin). Then just run:
make
make install
| Parallel Builds | |
| For multi-core / multi processor systems you can build much faster by passing the jobs argument to make: -j(1+number_of_cores). For example put "-j3" if you have a dual-core or "-j5" if you have a quad-core. Note that it may build faster, but make your system lag in the meanwhile. |
Once this completes you should end up with a blender.app in the directory blender-build/build_darwin/bin.
Building with XCode
Assuming you followed the steps above and configured CMake to build into its own folder inside a folder named "blender-build", there will be an XCode project located in "cmake/Blender.xcodeproj".
Double click it to open XCode.
XCode 4
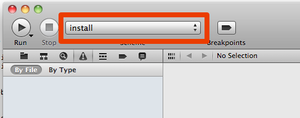
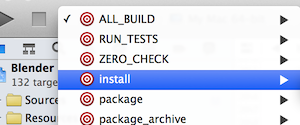
Set the Active Target to Install:
Open the scheme for "Install" target and set "Release" or "Debug", set executable to "Blender.app"
And now build (click on the "Run" Button shown in the image)!
When Xcode is finished, Blender will start automatically for testing.
XCode 5
1. Change the Active Scheme popup in the upper left corner of the XCode 5 project window from ALL_BUILD to Install
2. Select menu Product->Scheme->Edit Scheme
Edit Scheme is located all the way at the bottom of the list of targets. Or just Press Command-<.
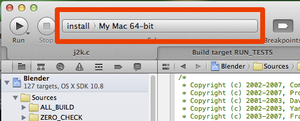
3. Select the Run item from the left view and you will see something like this:
4. Select the Blender App from the Executable popup menu.
You may leave the Debugger options at the defaults.
5. Click OK to save changes.
Now clicking the Run triangle next to the Active Scheme popup should now build the application and launch Blender under the debugger.
Building with SCons
!!! Scons was refactored in november 2013 !!!
Scons will setup all needed flags automatically depending on the defined architecture.
Default is to build 64bit_intel (x86_64) and cuda binaries disabled.
If you want change desired variables just create an user-config.py in the blender source root dir and add the variables you want affect.
Variables set in user-config will override the darwin-config correspondants
Example: For compiling 32bit_intel with cuda binaries precompiled, save the following text in user-config.py:
MACOSX_ARCHITECTURE = ‘i386‘ # valid archs: ppc, i386, ppc64, x86_64
WITH_BF_CYCLES_CUDA_BINARIES = True
Do never(!) change darwin-config.py directly.
MACOSX_ARCHITECTURE needs to be set to the correct architecture : ppc, i386 (Intel 32bit) or x86_64 (Intel 64bit)
After a first successful build, you can afterwards ("expert mode") tweak the other settings to make an optimized build.
Then launch the build:
python scons/scons.py -j x
Change "x" to the actual number of CPU cores you have in your system to accelerate the build process.
If everything went fine, the resulting blender.app will reside here: blender-build/install/darwin/blender.app
Expert tip:
You can have multiple specialized configs prepared and just use them with:
python scons/scons.py BF_CONFIG=<my_config> -j x
After drastic changes in the source directory structure, you may need to clean your build/install files to overcome build issues:
python scons/scons.py clean
郑重声明:本站内容如果来自互联网及其他传播媒体,其版权均属原媒体及文章作者所有。转载目的在于传递更多信息及用于网络分享,并不代表本站赞同其观点和对其真实性负责,也不构成任何其他建议。


