源码安装httpd2.4及实现用户访问控制及https的实现
实验环境:
CentOS release 6.6(Final) 1台
Windows XP 1台
IP地址:
172.16.31.8 http1.stu31.com web服务器端
172.16.31.188 Windows XP 测试客户端
WindowsXP 安装了chrom浏览器和系统自带的IE浏览器
软件版本:
httpd-2.4.9.tar.bz2
一.实验准备阶段:
程序开发包组安装
[root@http1 ~]# yum groupinstallDevelopment Tools
[root@http1 ~]# yum groupinstall ServerPlatform Development
支持正则表达式包安装:
[root@http1 ~]# yum install -y pcre-devel
安装openssl的开发包:
[root@http1 ~]# yum install –yopenssl-devel
二.DNS搭建
安装bind
[root@http1 ~]# yum install bind
配置主配置文件:
[root@http1 ~]# cat /etc/named.conf
//
// named.conf
//
// Provided by Red Hat bind package toconfigure the ISC BIND named(8) DNS
// server as a caching only nameserver (asa localhost DNS resolver only).
//
// See /usr/share/doc/bind*/sample/ forexample named configuration files.
//

options {
//     listen-on port 53 { 127.0.0.1; };
//     listen-on-v6 port 53 { ::1; };
       directory      "/var/named";
       dump-file      "/var/named/data/cache_dump.db";
       statistics-file "/var/named/data/named_stats.txt";
       memstatistics-file "/var/named/data/named_mem_stats.txt";
//     allow-query     { localhost; };
       recursion yes;

//     dnssec-enable yes;
//     dnssec-validation yes;
//     dnssec-lookaside auto;

       /* Path to ISC DLV key */
       /*bindkeys-file "/etc/named.iscdlv.key";

       managed-keys-directory "/var/named/dynamic";
       */
};

logging {
       channel default_debug {
                file"data/named.run";
                severity dynamic;
       };
};

zone "." IN {
       type hint;
       file "named.ca";
};

include"/etc/named.rfc1912.zones";
include "/etc/named.root.key";
配置主区域文件:
[root@http1 ~]# vim/etc/named.rfc1912.zones
zone "stu31.com" IN {
       type master;
       file "stu31.com.zone";
};
创建区域解析库文件:
[root@http1 ~]# cd /var/named
[root@http1 named]# vim stu31.com.zone
$TTL 600
$ORIGIN stu31.com.
@      IN      SOA     ns1.stu31.com.  admin.stu31.com. (
                        2014121501
                        1H
                        5M
                        3D
                        6H)
       IN      NS      ns1.stu31.com.
       IN      MX   5 mail
ns1     IN     A       172.16.31.8
www    IN      A       172.16.31.8
www1   IN      A       172.16.31.8
mail   IN      A       172.16.31.8
pop3   IN      CNAME   mail
iamp4  IN      CNAME   mail
区域文件语法检查:
[root@http1 named]# named-checkzonestu31.com stu31.com.zone
zone stu31.com/IN: loaded serial 2014121501
OK
启动DNS服务:
[root@http1 named]# service named start
Generating /etc/rndc.key:                                  [  OK  ]
Starting named:                                           [  OK  ]
测试DNS服务器:
[root@http1 named]# dig -t SOA [email protected] ; <<>> DiG9.8.2rc1-RedHat-9.8.2-0.30.rc1.el6 <<>> -t SOA [email protected] ;; global options: +cmd ;; Got answer: ;; ->>HEADER<<- opcode: QUERY,status: NOERROR, id: 5919 ;; flags: qr aa rd ra; QUERY: 1, ANSWER: 1,AUTHORITY: 1, ADDITIONAL: 1 ;; QUESTION SECTION: ;stu31.com. IN SOA ;; ANSWER SECTION: stu31.com. 600 IN SOA ns1.stu31.com.admin.stu31.com. 2014121501 3600 300 259200 21600 ;; AUTHORITY SECTION: stu31.com. 600 IN NS ns1.stu31.com. ;; ADDITIONAL SECTION: ns1.stu31.com. 600 IN A 172.16.31.8 ;; Query time: 0 msec ;; SERVER: 172.16.31.8#53(172.16.31.8) ;; WHEN: Mon Dec 15 12:07:37 2014 ;; MSG SIZE rcvd: 103
三.源码安装httpd-2.4.9
1.获取源码程序包及依赖程序源码apr及apr-util
[root@http1 ~]# ls
anaconda-ks.cfg    apr-util-1.5.3.tar.bz2  install.log
apr-1.5.0.tar.bz2  httpd-2.4.9.tar.bz2     install.log.syslog
[root@http1 ~]# tar xf apr-1.5.0.tar.bz2
2.编译安装apr:
[root@http1 apr-1.5.0]# ./configure--prefix=/usr/local/apr
[root@http1 apr-1.5.0]# make &&make install
[root@http1 apr-1.5.0]# ls /usr/local/apr/
bin build-1  include  lib
3.编译安装apr-util:
[root@http1 ~]# tar xfapr-util-1.5.3.tar.bz2
[root@http1 ~]# cd apr-util-1.5.3
需要告诉apr在哪里:
[root@http1 apr-util-1.5.3]# ./configure --prefix=/usr/local/apr-util--with-apr=/usr/local/apr
[root@http1 apr-util-1.5.3]#make && make install
4.编译安装httpd-2.4.9:
httpd2.2已经安装了,需要卸载,不卸载就需要将httpd-2.4安装在独立目录:
解压源码包:
[root@http1 ~]# tar xf httpd-2.4.9.tar.bz2
[root@http1 ~]# cd httpd-2.4.9
查看帮助:
[root@http1 httpd-2.4.9]# ./configure--help |less
重要常用选项介绍:
支持DSO装载:--enable-so
支持ssl加密:--enable-ssl
支持通用网关接口:--enable-cgi
支持URL重写:--enable-rewrite
使用特定压缩库:--with-zlib
支持扩展正则表达式:--with-pcre
程序依赖包apr:--with-apr
程序依赖包arp-util:--with-apr-util
模块启用,启用大多数:--enable-modules=most
编译安装:
[root@http1 httpd-2.4.9]# ./configure--prefix=/usr/local/apache --sysconfdir=/etc/httpd24 --enable-so--enable-ssl   --enable-cgi--enable-rewrite --with-zlib --with-pcre --with-apr=/usr/local/apr--with-apr-util=/usr/local/apr-util --enable-modules=most--enable-mpms-shared=all --with-mpm=prefork
[root@http1 httpd-2.4.9]#make &&make install
[root@http1 apache]# vim/etc/profile.d/httpd24.sh
export PATH=/usr/local/apache/bin:$PATH
[root@http1 apache]# source/etc/profile.d/httpd24.sh
[root@http1 httpd24]# echo $PATH
/usr/local/apache/bin:/usr/lib64/qt-3.3/bin:/usr/local/sbin:/usr/local/bin:/sbin:/bin:/usr/sbin:/usr/bin:/root/bin
[root@http1 apache]# which apachectl
/usr/local/apache/bin/apachectl
测试安装模块:
核心模块:
[root@http1 httpd-2.4.9]# httpd -l
Compiled in modules:
 core.c
 mod_so.c
 http_core.c
全部模块:可以知道MPM模式已经动态模块化了。
[root@http1 httpd-2.4.9]# httpd -M
Loaded Modules:
 core_module (static)
 so_module (static)
 http_module (static)
 authn_file_module (shared)
 authn_core_module (shared)
 authz_host_module (shared)
 authz_groupfile_module (shared)
 authz_user_module (shared)
 authz_core_module (shared)
 access_compat_module (shared)
 auth_basic_module (shared)
 reqtimeout_module (shared)
 filter_module (shared)
 mime_module (shared)
 log_config_module (shared)
 env_module (shared)
 headers_module (shared)
 setenvif_module (shared)
 version_module (shared)
 mpm_prefork_module (shared)
 unixd_module (shared)
 status_module (shared)
 autoindex_module (shared)
 dir_module (shared)
 alias_module (shared)
启动httpd服务:
[root@http1 ~]# apachectl start
查看服务监听端口:
[root@http1 ~]# ss -tnl |grep 80
LISTEN    0      128                      :::80                      :::*
5.配置一个简单的web网页测试:
[root@http1 ~]# vim /etc/httpd24/httpd.conf
ServerRoot "/www/htdocs/"
Pidfile"/var/run/httpd/httpd.pid"
ServerName www.stu31.com:80
DocumentRoot "/www/htdocs"
<Directory "/www/htdocs">
   Options Indexes FollowSymLinks
   AllowOverride None
   Require all granted
</Directory>
6.服务脚本创建:
[root@http1 ~]# cat/etc/rc.d/init.d/httpd24
#!/bin/bash
#
# httpd24        Startup script for the Apache HTTPServer
#
# chkconfig: - 85 15
# description: The Apache HTTP Server is anefficient and extensible  #              server implementing the currentHTTP standards.
# processname: httpd
# config: /etc/httpd/conf/httpd.conf
# config: /etc/sysconfig/httpd
# pidfile: /var/run/httpd/httpd.pid
#
### BEGIN INIT INFO
# Provides: httpd
# Required-Start: $local_fs $remote_fs$network $named
# Required-Stop: $local_fs $remote_fs$network
# Should-Start: distcache
# Short-Description: start and stop ApacheHTTP Server
# Description: The Apache HTTP Server is anextensible server
# implementing the current HTTP standards.
### END INIT INFO

# Source function library.
. /etc/rc.d/init.d/functions

#if [ -f /etc/sysconfig/httpd ]; then
#       . /etc/sysconfig/httpd
#fi

# Start httpd in the C locale by default.
HTTPD_LANG=${HTTPD_LANG-"C"}

# This will prevent initlog from swallowingup a pass-phrase prompt if
# mod_ssl needs a pass-phrase from theuser.
INITLOG_ARGS=""

# Set HTTPD=/usr/sbin/httpd.worker in/etc/sysconfig/httpd to use a server
# with the thread-based "worker"MPM; BE WARNED that some modules may not
# work correctly with a thread-based MPM;notably PHP will refuse to start.

# Path to the apachectl script, serverbinary, and short-form for messages.
apachectl=/usr/local/apache/bin/apachectl
httpd=${HTTPD-/usr/local/apache/bin/httpd}
prog=httpd
pidfile=${PIDFILE-/var/run/httpd/httpd.pid}
lockfile=${LOCKFILE-/var/lock/subsys/httpd}
RETVAL=0
STOP_TIMEOUT=${STOP_TIMEOUT-10}

# The semantics of these two functions differfrom the way apachectl does
# things -- attempting to start whilerunning is a failure, and shutdown
# when not running is also a failure.  So we just do it the way init scripts
# are expected to behave here.
start() {
       echo -n $"Starting $prog: "
       LANG=$HTTPD_LANG daemon --pidfile=${pidfile} $httpd $OPTIONS
       RETVAL=$?
       echo
       [ $RETVAL = 0 ] && touch ${lockfile}
       return $RETVAL
}

# When stopping httpd, a delay (of default10 second) is required
# before SIGKILLing the httpd parent; thisgives enough time for the
# httpd parent to SIGKILL any errantchildren.
stop() {
       echo -n $"Stopping $prog: "
       killproc -p ${pidfile} -d ${STOP_TIMEOUT} $httpd
       RETVAL=$?
       echo
       [ $RETVAL = 0 ] && rm -f ${lockfile} ${pidfile}
}
reload() {
   echo -n $"Reloading $prog: "
   if ! LANG=$HTTPD_LANG $httpd $OPTIONS -t >&/dev/null; then
       RETVAL=6
       echo $"not reloading due to configuration syntax error"
       failure $"not reloading $httpd due to configuration syntaxerror"
   else
       # Force LSB behaviour from killproc
       LSB=1 killproc -p ${pidfile} $httpd -HUP
       RETVAL=$?
       if [ $RETVAL -eq 7 ]; then
           failure $"httpd shutdown"
       fi
    fi
   echo
}

# See how we were called.
case "$1" in
 start)
       start
       ;;
 stop)
       stop
       ;;
 status)
       status -p ${pidfile} $httpd
       RETVAL=$?
       ;;
 restart)
       stop
       start
       ;;
 condrestart|try-restart)
       if status -p ${pidfile} $httpd >&/dev/null; then
                stop
                start
       fi
       ;;
 force-reload|reload)
       reload
       ;;
 graceful|help|configtest|fullstatus)
       $apachectl $@
       RETVAL=$?
       ;;
  *)
       echo $"Usage: $prog{start|stop|restart|condrestart|try-restart|force-reload|reload|status|fullstatus|graceful|help|configtest}"
       RETVAL=2
esac

exit $RETVAL
7.添加到启动项并启动服务
[root@http1 ~]# chkconfig --add httpd24
[root@http1 ~]# chkconfig httpd24 on
[root@http1 ~]# service httpd24 start
Starting httpd:                                           [  OK  ]
成功启动
四:基于IP的虚拟主机配置;
1.创建web网页存放目录:
[root@http1 ~]# mkdir /web/vhosts/www1 -pv
mkdir: created directory `/web‘
mkdir: created directory `/web/vhosts‘
mkdir: created directory `/web/vhosts/www1‘
2.加入测试网页:
[root@http1 ~]# vim/web/vhosts/www1/index.html
/web/vhosts/www1  172.16.31.8:80
[root@http1 ~]# mkdir /web/vhosts/www2
[root@http1 ~]# echo "access from192" > /web/vhosts/www2/index.html
3.修改httpd主配置文件
注释掉主服务器部分,开启虚拟主机
[root@http1 ~]# vim /etc/httpd24/httpd.conf
ServerRoot "/usr/local/apache/"
Pidfile"/var/run/httpd/httpd.pid"
Listen 80
#ServerName www.stu31.com:80
#DocumentRoot "/www/htdocs"
# Virtual hosts
Include/etc/httpd24/extra/httpd-vhosts.conf
4.编辑基于IP的虚拟主机
[root@http1 ~]# vim/etc/httpd24/extra/httpd-vhosts.conf
<VirtualHost 172.16.31.8:80>
   DocumentRoot "/web/vhosts/www1"
   ServerName www.stu31.com
   ErrorLog "/web/vhosts/www1/www1-error_log"
   CustomLog "/web/vhosts/www1/www1-access_log" common
</VirtualHost>

<Directory /web/vhosts/www1>
   Require all granted
</Directory>

<VirtualHost 192.168.31.8:80>
   DocumentRoot "/web/vhosts/www2"
   ServerName www.stu31.com
   ErrorLog "/web/vhosts/www2/www1-error_log"
   CustomLog "/web/vhosts/www2/www1-access_log" common
</VirtualHost>

<Directory /web/vhosts/www2>
   Require all granted
</Directory>
5.添加一个ip地址,用于测试不同ip的返回结果:
[root@http1 ~]# ip addr add 192.168.31.8/24dev eth0
[root@http1 ~]# ip addr show eth0
2: eth0:<BROADCAST,MULTICAST,UP,LOWER_UP> mtu 1500 qdisc pfifo_fast state UP qlen1000
   link/ether 08:00:27:7c:87:48 brd ff:ff:ff:ff:ff:ff
   inet 172.16.31.8/16 brd 172.16.255.255 scope global eth0
   inet 192.168.31.8/24 scope global eth0
   inet6 fe80::a00:27ff:fe7c:8748/64 scope link
      valid_lft forever preferred_lft forever
6.启动服务进行测试:
[root@http1 ~]# service httpd24restart
Stopping httpd:                                           [  OK  ]
Starting httpd:                                           [  OK  ]
[root@http1 ~]# curl 192.168.31.8
access from 192
[root@http1 ~]# curl 172.16.31.8
/web/vhosts/www1  172.16.31.8:80
五.基于端口的虚拟主机搭建
1.编辑虚拟主机配置文件,添加端口,小小的修改一下:
[root@http1 ~]# vim/etc/httpd24/extra/httpd-vhosts.conf
Listen 8080

<VirtualHost 172.16.31.8:80>
   DocumentRoot "/web/vhosts/www1"
   ServerName www.stu31.com
   ErrorLog "/web/vhosts/www1/www1-error_log"
   CustomLog "/web/vhosts/www1/www1-access_log" common
</VirtualHost>

<Directory /web/vhosts/www1>
   Require all granted
</Directory>


<VirtualHost 172.16.31.8:8080>
   DocumentRoot "/web/vhosts/www2"
    ServerName www.stu31.com
   ErrorLog "/web/vhosts/www2/www1-error_log"
   CustomLog "/web/vhosts/www2/www1-access_log" common
</VirtualHost>

<Directory /web/vhosts/www2>
   Require all granted
</Directory>
2.重启服务测试
[root@http1 ~]# service httpd24restart
Stopping httpd:                                           [  OK  ]
Starting httpd:                                           [  OK  ]
[root@http1 ~]# curl 172.16.31.8:80
/web/vhosts/www1  172.16.31.8:80
[root@http1 ~]# curl 172.16.31.8:8080
access from 192
[root@http1 ~]#
六.基于域名的虚拟主机
1.修改一下测试网页,以便分辨
[root@http1 ~]# cat/web/vhosts/www1/index.html
/web/vhosts/www1  172.16.31.8:80

[root@http1 ~]# cat/web/vhosts/www2/index.html
/web/vhost/www2 www1.stu31.com
2.在虚拟主机配置文件中定义
在httpd2.2版本定义基于域名的虚拟主机时,需要加入如下现象,在2.4则不再需要,直接定义即可
[root@http1 ~]# vim/etc/httpd24/extra/httpd-vhosts.conf
<VirtualHost 172.16.31.8:80>
   DocumentRoot "/web/vhosts/www1"
   ServerName www.stu31.com
   ErrorLog "/web/vhosts/www1/www1-error_log"
   CustomLog "/web/vhosts/www1/www1-access_log" common
</VirtualHost>

<Directory /web/vhosts/www1>
   Require all granted
</Directory>


<VirtualHost 172.16.31.8:80>
   DocumentRoot "/web/vhosts/www2"
   ServerName www1.stu31.com
   ErrorLog "/web/vhosts/www2/www2-error_log"
   CustomLog "/web/vhosts/www2/www2-access_log" common
</VirtualHost>

<Directory /web/vhosts/www2>
   Require all granted
</Directory>
3.重启服务测试
[root@http1 ~]# service httpd24restart
Stopping httpd:                                           [  OK  ]
Starting httpd:                                           [  OK  ]


[root@http1 ~]# curl www.stu31.com
/web/vhosts/www1  172.16.31.8:80
[root@http1 ~]# curl www1.stu31.com
/web/vhost/www2 www1.stu31.com
六.用户访问控制实现
1.我们需要对www.stu31.com的状态信息网页进行用户访问控制:
查看编译有没有状态信息模块:
[root@http1 ~]# ls/usr/local/apache/modules/ |grep mod_status
mod_status.so
2.我们需要在网页查看apache的状态信息,apache状态信息模块是默认开启的
[root@http1 ~]# vim /etc/httpd24/httpd.conf
LoadModule status_modulemodules/mod_status.so
3.
编辑虚拟主机配置文件,修改第一个虚拟主机
[root@http1 ~]# vim/etc/httpd24/extra/httpd-vhosts.conf
<VirtualHost 172.16.31.8:80>
   DocumentRoot "/web/vhosts/www1"
   ServerName www.stu31.com
   ErrorLog "/web/vhosts/www1/www1-error_log"
   CustomLog "/web/vhosts/www1/www1-access_log" common
   <Location /server-status>
       SetHandler server-status
       Authtype   Basic
       Authname   "status area"
       AuthUserFile /etc/httpd24/users/.htpasswd
       Require valid-user
   </Location>
</VirtualHost>
4.创建配置文件中需要的用户控制认证文件
[root@http1 ~]# mkdir /etc/httpd24/users
[root@http1 ~]# htpasswd -c -m/etc/httpd24/users/.htpasswd status
New password:
Re-type new password:
Adding password for user status
5.重启服务进行测试
[root@http1 ~]# service httpd24 restart
Stopping httpd:                                           [  OK  ]
Starting httpd:                                           [  OK  ]
七.实现网站https加密传输
要求:我们针对www1.stu31.com实现https加密认证传输
1.mod_ssl模块的检查存在和装载
[root@http1 ~]# ls/usr/local/apache/modules/ |grep mod_ssl
mod_ssl.so
2.构建私有CA服务器
[root@http1 ~]# cd /etc/pki/CA/
私钥文件建立:
[root@http1 CA]# (umask 077 ; opensslgenrsa -out private/cakey.pem 2048)
Generating RSA private key, 2048 bit longmodulus
...............+++
.............................+++
e is 65537 (0x10001)
自签署证书构建:
[root@http1 CA]# openssl req -new -x509-key private/cakey.pem -out cacert.pem -days 3650 You are about to be asked to enter informationthat will be incorporated into your certificate request. What you are about to enter is what iscalled a Distinguished Name or a DN. There are quite a few fields but you canleave some blank For some fields there will be a defaultvalue, If you enter ‘.‘, the field will be leftblank. ----- Country Name (2 letter code) [XX]:CN State or Province Name (full name) []:HA Locality Name (eg, city) [Default City]:ZZ Organization Name (eg, company) [DefaultCompany Ltd]:stu31 Organizational Unit Name (eg, section)[]:ops Common Name (eg, your name or your server‘shostname) []:www1.stu31.com Email Address []:[email protected]
CA服务器索引库构建:
[root@http1 CA]# touch index.txt
CA服务器序列号文件:
[root@http1 CA]# touch serial
[root@http1 CA]# echo 01 >serial
[root@http1 CA]# ls
cacert.pem certs  crl  index.txt newcerts  private  serial
3.web服务器证书申请
[root@http1 CA]# mkdir /etc/httpd24/certs
[root@http1 CA]# cd /etc/httpd24/certs
web服务器私钥生成:
[root@http1 certs]# (umask 077; opensslgenrsa -out httpd.key 2048)
Generating RSA private key, 2048 bit longmodulus
...............+++
............................................................+++
e is 65537 (0x10001)
web服务器证书请求生成:
[root@http1 certs]# openssl req -new -keyhttpd.key -out httpd.csr -days 3650 You are about to be asked to enterinformation that will be incorporated into your certificate request. What you are about to enter is what iscalled a Distinguished Name or a DN. There are quite a few fields but you canleave some blank For some fields there will be a defaultvalue, If you enter ‘.‘, the field will be leftblank. ----- Country Name (2 letter code) [XX]:CN State or Province Name (full name) []:HA Locality Name (eg, city) [Default City]:ZZ Organization Name (eg, company) [DefaultCompany Ltd]:stu31 Organizational Unit Name (eg, section)[]:ops Common Name (eg, your name or your server‘shostname) []:www1.stu31.com Email Address []:[email protected] Please enter the following ‘extra‘attributes to be sent with your certificate request A challenge password []: An optional company name []:
4.CA服务器签署web服务器的证书
[root@http1 certs]# openssl ca -inhttpd.csr -out httpd.crt -days 3650 Using configuration from/etc/pki/tls/openssl.cnf Check that the request matches thesignature Signature ok Certificate Details: Serial Number: 1 (0x1) Validity Not Before: Dec 15 05:48:01 2014 GMT Not After : Dec 12 05:48:01 2024 GMT Subject: countryName = CN stateOrProvinceName = HA organizationName = stu31 organizationalUnitName = ops commonName =www1.stu31.com emailAddress =[email protected] X509v3 extensions: X509v3 Basic Constraints: CA:FALSE Netscape Comment: OpenSSL Generated Certificate X509v3 Subject Key Identifier: C4:87:AD:7C:62:92:A1:DA:6D:40:BE:F8:4C:EC:2F:2E:71:9B:D7:35 X509v3 Authority Key Identifier: keyid:D9:4A:F1:A1:16:F2:5F:89:49:C5:0B:93:B5:B3:11:57:0A:DA:2F:54 Certificate is to be certified until Dec 1205:48:01 2024 GMT (3650 days) Sign the certificate? [y/n]:y 1 out of 1 certificate requests certified, commit?[y/n]y Write out database with 1 new entries Data Base Updated
5.httpd服务器开启https加密传输
修改主配置文件加载如下模块及开启httpd的ssl:
[root@http1 certs]# vim/etc/httpd24/httpd.conf
LoadModule socache_shmcb_modulemodules/mod_socache_shmcb.so
LoadModule ssl_module modules/mod_ssl.so
# Secure (SSL/TLS) connections
Include /etc/httpd24/extra/httpd-ssl.conf
配置ssl配置文件,开启https传输:
[root@http1 certs]# vim/etc/httpd24/extra/httpd-ssl.conf <VirtualHost 172.16.31.8:443> DocumentRoot "/web/vhosts/www2" ServerName www1.stu31.com:443 ServerAdmin [email protected] ErrorLog"/usr/local/apache/logs/error_log" TransferLog"/usr/local/apache/logs/access_log" SSLEngine on SSLCertificateFile"/etc/httpd24/certs/httpd.crt" SSLCertificateKeyFile"/etc/httpd24/certs/httpd.key" </VirtualHost>
6.检查语法,重新启动httpd服务测试:
[root@http1 certs]# httpd -t
Syntax OK
[root@http1 certs]# service httpd restart
Stopping httpd:                                           [  OK  ]
Starting httpd:                                           [  OK  ]
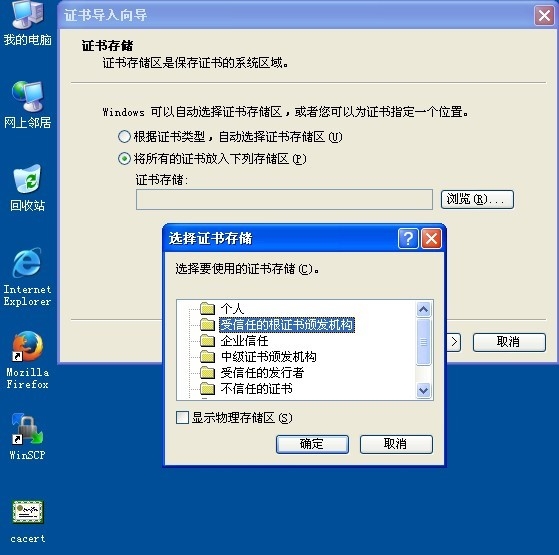
将CA服务器的证书发送给客户端
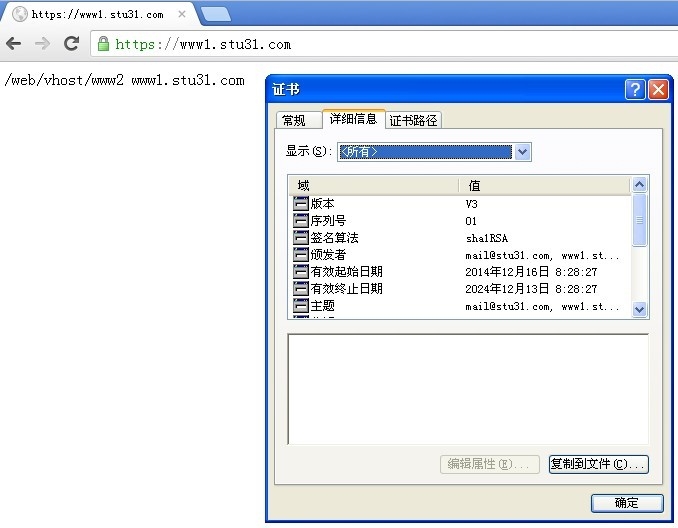
客户端安装证书进行测试:
实验成功,整个源码编译安装apache httpd-2.4.9完成了!!!
本文出自 “龙之守护” 博客,请务必保留此出处http://sohudrgon.blog.51cto.com/3088108/1590841
郑重声明:本站内容如果来自互联网及其他传播媒体,其版权均属原媒体及文章作者所有。转载目的在于传递更多信息及用于网络分享,并不代表本站赞同其观点和对其真实性负责,也不构成任何其他建议。


