httpd 基于用户的访问控制的配置
当我们在网站的某些特定目录放置了比较私密的信息,而又只想提供给我们信任的指定用户访问,这时就需要使用httpd的基于用户访问控制,其能帮你实现只有通过认证的用户才能被允许访问特定的资源,从而大大提高了网站的安全性。
一、httpd基于用户的访问控制简介
基于用户的访问控制包含认证和授权两个过程:
认证(Authentication)是指识别用户身份的过程
授权(Authorization)是允许特定用户访问特定区域信息的过程。
Apache的认证包含基本认证(Basic)和摘要认证(Digest)两种方式
基本认证是Apache的基本功能,采用base64 加密 明文发送
摘要认证需要在编译httpd的过程中预先配置“--enable-auth-digest”,部分浏览器不支持
当用户访问基于用户认证网页时会经历一下两个阶段:
质询:
WWW-Authenticate: 服务器用401状态拒绝客户端请求,说明需要用户提供用户名和密码;弹出对话框;
认证:
Authorization:客户端用户填入账号密码后再次发请求至服务器;认证通过,则请求授权;
二、基于basic认证的配置
1、创建需要认证的目录
    [root@1inux html]# mkdir /vhost/www/html/net
    [root@1inux html]# echo "<h1>This is a basic Page</h1>" > /vhost/www/html/net/index.html
    [root@1inux html]#
2、创建虚拟用户
2.1、创建虚拟用户及文件
创建虚拟账户需要用到htpasswd命令,具体参数如下:
     htpasswd命令用于维护用户认证文件
            htpasswd [ -c ] [ -m ] [ -D ] passwdfile username
                         -c: 添加第一用户时创建此文件;
                         -m: 以md5格式加密用户密码存放;
                         -s: 以sha格式加密用户密码存放;
                         -D:删除指定用户
[root@1inux html]# mkdir /etc/httpd/users
[root@1inux html]# htpasswd -m -c /etc/httpd/users/.htpasswd sina    //第一次需要用-c 创建文件
New password:         //输入认证时的密码
Re-type new password:
Adding password for user sina
[root@1inux html]# htpasswd -m /etc/httpd/users/.htpasswd baidu    //创建第二个虚拟用户
New password:
Re-type new password:
Adding password for user baidu
[root@1inux html]# htpasswd -m /etc/httpd/users/.htpasswd ifeng
New password:
Re-type new password:
Adding password for user ifeng
[root@1inux html]#
2.2、为了保证认证用户的账号密码安全,通常对其文件进行权限修改
[root@1inux html]# ls -l /etc/httpd/users/.htpasswd
-rw-r--r--. 1 root root 131 Mar 29 04:58 /etc/httpd/users/.htpasswd
[root@1inux html]# chmod 600 /etc/httpd/users/.htpasswd
[root@1inux html]# ls -l /etc/httpd/users/.htpasswd
-rw-------. 1 root root 131 Mar 29 04:58 /etc/httpd/users/.htpasswd
[root@1inux html]#
3、修改/etc/httpd/conf/httpd.conf
<Directory "/vhost/www/html/net">
     Options None
     AllowOverride None
     AuthType Basic    //基于basic认证
     AuthName "Please input user and password to login"    //登录提示的欢迎信息
     AuthUserFile /etc/httpd/users/.htpasswd    //认证用户密码文件
     Require user sina ifeng baidu    //指定.htpasswd 文件中的特定用户登录
</Directory>
AuthName:定义受保护的领域名称,将在弹出的认证登录对话框中显示。
AuthType:设置认证的类型,Basic为基本认证
AuthUserFile:设置用于保存用户帐号、密码的认证文件路径。
Require valid-user:授权给认证文件中的所有有效用户
Require user user1 user2 ...: 仅允许AuthUserFile文件中定义的的user1,user2用户登录;用户之间用空格隔开
AuthGroupFile 用户组文件
Require group GRP1 GRP2 ... 修改完成后 ,
重载配置文件# service httpd reload
三、基于用户访问的访问控制验证
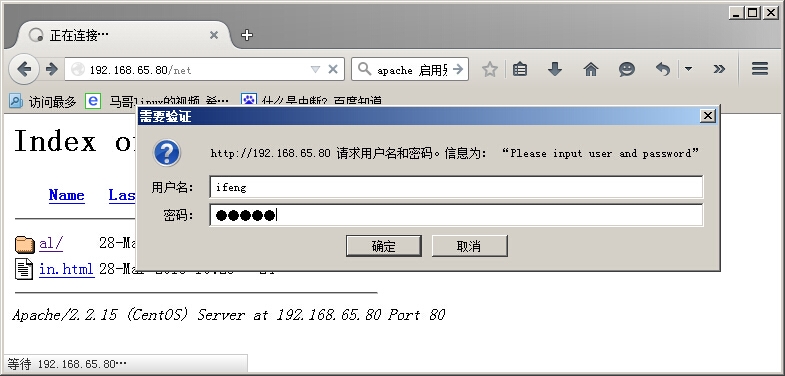
1、当访问我们要保护的net目录时,提示要输入用户名密码验证完成才能访问,如下图
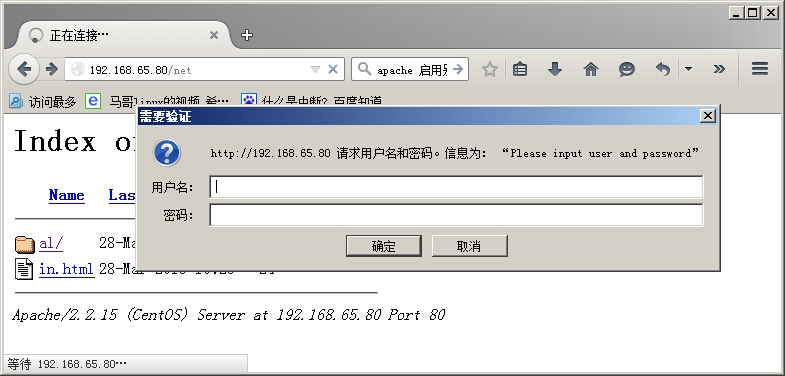
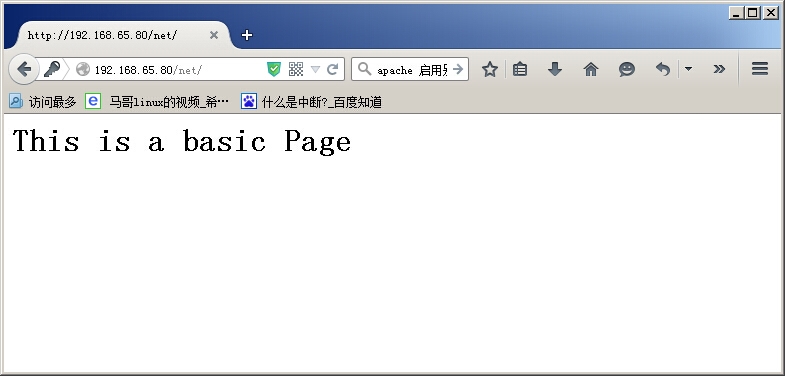
2、输入认证的用户名密码,然后点击确定
OK httpd基于用户认证的到此就配置完毕
四、基于用户组的访问控制
当网站有过个需要认证的目录时,并且每个目录需要认证用户群体不一样,这时就需要用到基于用户组的访问控制了。
4.1、创建认证保护的目录及存储用户的文件,同上2.2
[root@1inux ~]# mkdir /vhost/www/html/{news,blog}
[root@1inux ~]# ls /vhost/www/html/
al  blog  in.html  net  news
[root@1inux ~]# echo "<h1>This is a news page </h1>" > /vhost/www/html/news/index.html
[root@1inux ~]# echo "<h1>This is a blog page </h1>" > /vhost/www/html/blog/index.html


[root@1inux html]# htpasswd -m /etc/httpd/users/.htpasswd sina.blog
New password:
Re-type new password:
Adding password for user sina.blog
[root@1inux html]# cat /etc/httpd/users/.htpasswd
sina:$apr1$rtmSis3y$F.fQjt1.jr54hFaOQxuTG1
baidu:$apr1$y8pkUJ5U$7WTUhdmI21PEDQloLaFzm0
ifeng:$apr1$RanhUWgx$4In/BYbyuNlWPUJSmuQDD0
126:$apr1$qlbgyeJs$ot.qoWMdAdV.IkElU9OZ/1
haha:$apr1$ELM3prR6$ipW3YP2A/4CBnHKvqwsUn1
51cto:$apr1$P1x815aN$LXY55k/DEZPmmUCySIx1A1
sina.blog:$apr1$EBghuchO$RpKvz/DV8XkxyidVgNHPi/
[root@1inux html]#
4.2、创建用户组文件
组文件格式:
每行定义一个组,格式
Grp_Name: User1 User2 ..
[root@1inux html]# vim /etc/httpd/users/.htgroup
[root@1inux html]# cat /etc/httpd/users/.htgroup
news: ifeng 126 sina
blog: 51cto sina.blog
[root@1inux html]#
4.3、编辑/etc/httpd/conf/httpd.conf
#news
<Directory "/vhost/www/html/news">
Options None
AllowOverride None
AuthType Basic
AuthName "Please input user and password"
AuthUserFile /etc/httpd/users/.htpasswd
AuthGroupFile /etc/httpd/users/.htgroup
Require Group news
</Directory>
# blog
<Directory "/vhost/www/html/blog">
Options None
AllowOverride None
AuthType Basic
AuthName "Please input blog‘s user and password"
AuthUserFile /etc/httpd/users/.htpasswd
AuthGroupFile /etc/httpd/users/.htpgroup
Require Group blog
</Directory>
4.4、重载配置文件
[root@1inux ~]# service httpd reload
Reloading httpd:
[root@1inux ~]#
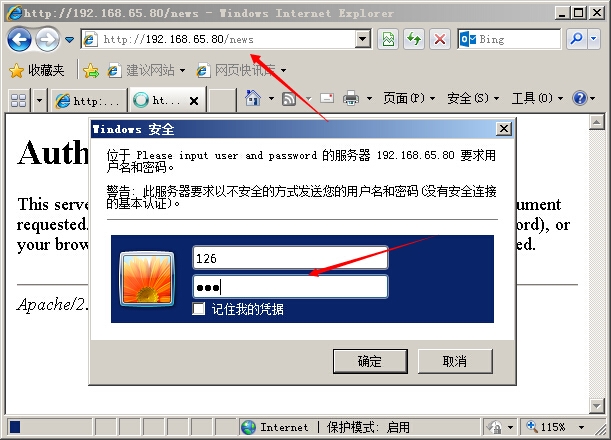
4.5、访问http://192.168.65.80/news/目录发现需要我们输入用户名密码进行验证,当我们输入.htgroup文件中news组中所属的用户时才能通过验证,非此组的用户无法登陆
4.5、我们访问 http://192.168.65.80/blog/目录:
当我们输入非blog组的用户126时,一直提示让输入用户名密码,而无法通过验证
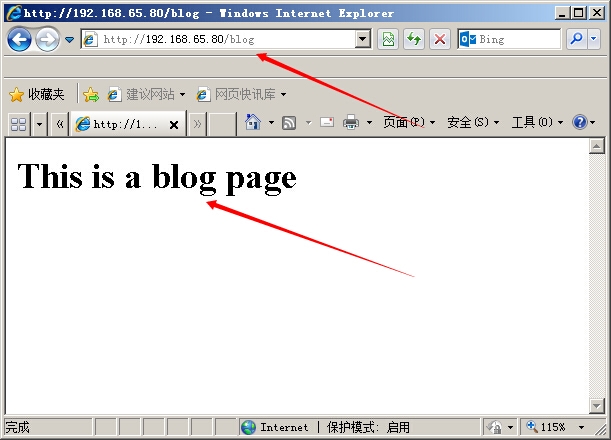
当我们输入属于blog组的51cto用户时,出现了下面的界面,即通过了认证...
Ok 基于用户的访问控制基本用法已经到此就告一段落了,不足之处还请各位童鞋指正......
本文出自 “无常” 博客,请务必保留此出处http://1inux.blog.51cto.com/10037358/1640556
郑重声明:本站内容如果来自互联网及其他传播媒体,其版权均属原媒体及文章作者所有。转载目的在于传递更多信息及用于网络分享,并不代表本站赞同其观点和对其真实性负责,也不构成任何其他建议。


