定制微型Linux系统
前言
1、使用以下命令获取本机硬件信息:
# cat /proc/cpuinfo
# cat /proc/meminfo
# lspci -v
2、实验目的
这次实验的目的是:借助于宿主机(正常安装CentOS6.5系统),在目标机上构建一个微型Linux系统,能提供基本的bash命令行接口,提供基本的网络功能,提供用户登录接口和完成身份验证,提供远程连接功能,提供nginx功能。
3、实验说明
(1)宿主机:正常安装CentOS6.5系统(ip : 192.168.1.152)
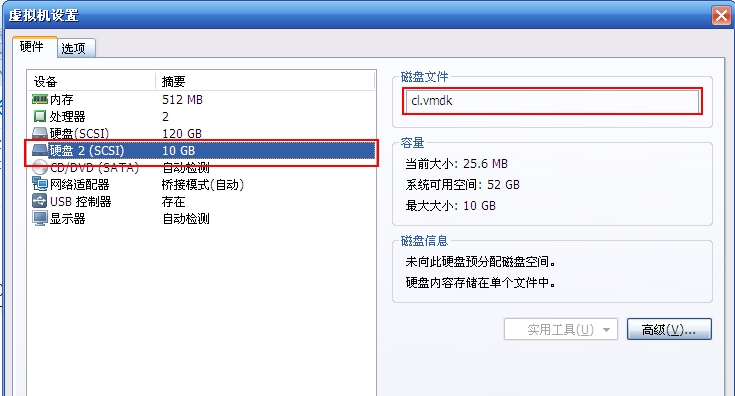
把宿主机上的第二块磁盘cl.vmdk作为目标机上仅有的一块磁盘。
(2)目标机
使用VMware创建目标机时,不创建新的磁盘,而是使用宿主机上的第二块磁盘作为目标机的唯一一块磁盘。
注意:目标机只有一块磁盘。
一、提供一个基本的bash命令行接口
注意:记得在宿主机上进行的操作,一定要使用sync命令同步到对应磁盘上。
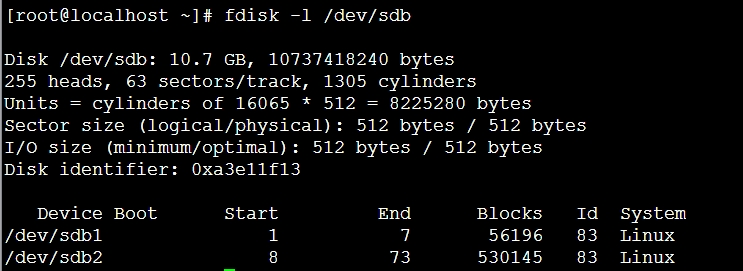
1、在宿主机的另一块磁盘/dev/sdb 上分区、格式化、挂载
(1)分区
/dev/sdb1 50M
/dev/sdb2 512M
(2)格式化
# mke2fs  -t ext4  /dev/sdb1
# mke2fs  -t ext4  /dev/sdb2
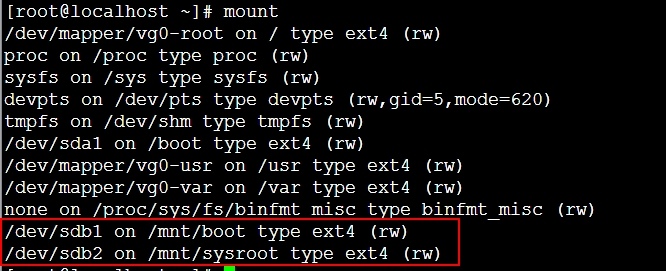
(3)挂载
# mkdir  -pv  /mnt/{boot,sysroot}
# mount  /dev/sdb1  /mnt/boot
# mount /dev/sdb2 /mnt/sysroot2、编译内核
下载Linux内核源代码linux-3.13.6.tar.xz 并解压到/usr/src中
# tar xf linux-3.13.6.tar.xz -C /usr/src
创建软链接
# cd /usr/src
# ln -sv linux-3.13.6 linux
`linux‘ -> `linux-3.13.6‘
内核的 allnoconfig 配置目标会把所有的内核选项都设置为no(除了一些必须设为yes的内核选项外),也就是把它们既不编译进内核,也不编译成模块。
# cd linux
# make allnoconfig  #把所有非必选的内核选项都设置为no
手动选择内核编译的配置
# make menuconfig
要手动勾选的内核选项
64-kit kernel  #必须跟宿主机的平台保持一致
Ceneral setup
    --> Local version - append to kernel release  #手动设定内核版本号
    --> System V IPC  #支持system V 风格的IPC(进程间通信),可选也可忽略。
Enable loadable module support
    --> Module unloading    #选择支持动态卸载模块
Enable the block layer
    --> Block layer SG support v4  #选择支持使用块层
Processor type and features
    --> Symmetric multi-processing support #支持对称多处理器
    --> Processor family
        --> Core 2/newer Xeon   #选择合适的CPU类型
    --> Multi-core scheduler suppor  #支持多核调度
Bus options (PCI etc.)
    --> PCI support  #选择支持PCI总线
Executable file formats / Emulations #可执行文件格式或类型
    --> Kernel support for ELF binaries  #支持ELF格式
    --> Kernel support for scripts starting with #!  #支持#!开头的脚本格式
Networking support
    --> Networking options
        --> TCP/IP networking   #支持网络功能
        --> Unix domain sockets #选择支持Unix domain sockets 协议(如果要在以下扩展nginx功能,这项必需)
Device Drivers
    --> Generic Driver Options  #选择支持把内核探测设备生成的设备文件挂载到/dev目录下
        --> Maintain a devtmpfs filesystem to mount at /dev
        --> Automount devtmpfs at /dev, after the kernel mounted the rootfs
    --> SCSI device support
        --> SCSI device support
        --> SCSI disk support
    --> Fusion MPT device support
        --> Fusion MPT ScsiHost drivers for SPI
        --> Fusion MPT logging facility
    --> Network device support  #选择网卡驱动
        --> Ethernet driver support
            --> Intel devices
                --> Intel(R) PRO/1000 Gigabit Ethernet support
                --> Intel(R) PRO/1000 PCI-Express Gigabit Ethernet support
    --> Input device support  #选择支持输入设备(键盘和鼠标)
        --> Mouse interface
        --> Keyboards
        --> Mice
    --> USB support  #选择USB驱动
        --> xHCI HCD (USB 3.0) support
        --> EHCI HCD (USB 2.0) support
        --> OHCI HCD (USB 1.1) support
        --> UHCI HCD (most Intel and VIA) support
File systems
    --> The Extended 4 (ext4) filesystem #选择ext4类型文件系统
编译内核
# make -j 4
3、把宿主机上编译生成的bzImage复制到目标机上
# cp arch/x86_64/boot/bzImage /mnt/boot
# sync  #使得操作同步到磁盘
4、给目标机安装grub并提供grub配置文件
安装grub
# grub-install --root-directory=/mnt /dev/sdb
# cd /mnt/boot
# ls
grub  lost+found
给grub提供配置文件
[root@localhost boot]# cd grub/
[root@localhost grub]# vim grub.conf
timeout=10
default=0
title Customed Linux( 3.13.6 )
root (hd0,0)
kernel /bzImage ro root=/dev/sda2 init=/sbin/init
5、为目标机提供根文件系统
# cd /mnt/sysroot
# mkdir -pv bin sbin root home etc/init.d proc sys mnt media var tmp usr/{sbin,bin} lib646、在目标机sbin目录下提供init脚本
#!/bin/bash
#
echo -e "Welcome to \033[34mCustomed\033[0m Linux"
mount -n -t proc proc /proc
mount -n -t sysfs sysfs /sys
mount -n -t devtmpfs none /dev
mount -n -o remount,rw /dev/sdb2 /
/bin/bash
[root@localhost sbin]# chmod +x init  #赋予该脚本执行权限
[root@localhost sbin]# ll init
-rwxr-xr-x 1 root root 198 Aug 20 02:47 init
[root@localhost sbin]# bash -n init  #检查语法
7、使用bincp.sh脚本为目标机提供一些命令
[root@localhost ~]# ./bincp.sh
Plz enter a command: mount
Plz enter a command: umount
Plz enter a command: ls
Plz enter a command: ps
Plz enter a command: kill
Plz enter a command: cat
Plz enter a command: bash
[root@localhost ~]# sync  #注意:操作完后一定要记得同步到磁盘上
[root@localhost ~]# chroot /mnt/sysroot  #切换根目录来测试
bash-4.1# ls
bin  etc  homelib64  lost+found  media  mnt  proc  root  sbin  sys  tmp  usrvar
bash-4.1# exit
exit
[root@localhost ~]#
bincp.sh脚本内容如下:
#!/bin/bash
#
target=/mnt/sysroot/

[ -d $target ] || mkdir $target

preCommand() {
    if which $1 &> /dev/null; then
commandPath=`which --skip-alias $1`
return 0
    else
echo "No such command."
return 1
    fi
}

commandCopy() {
    commandDir=`dirname $1`
    [ -d ${target}${commandDir} ] || mkdir -p ${target}${commandDir}
    [ -f ${target}${commandPath} ] || cp $1 ${target}${commandDir}
}

libCopy() {
    for lib in `ldd $1 | egrep -o "/[^[:space:]]+"`; do
libDir=`dirname $lib`
[ -d ${target}${libDir} ] || mkdir -p ${target}${libDir}
[ -f ${target}${lib} ] || cp $lib ${target}${libDir}
    done
}

read -p "Plz enter a command: " command

until [ "$command" == ‘quit‘ ]; do

  if preCommand $command ; then
    commandCopy $commandPath
    libCopy $commandPath
  fi

  read -p "Plz enter a command: " command
done8、启动目标机,进行初步测试
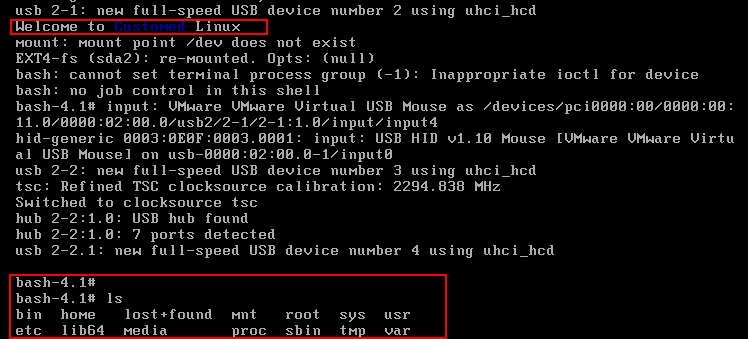
测试成功,在目标机上能正常打开bash命令行,相关的命令也有效
二、为目标机系统提供登录认证(使用busybox)
1、编译安装busybox
BusyBox介绍:
BusyBox 是一个集成了一百多个最常用linux命令和工具的软件。BusyBox 包含了一些简单的工具,例如ls、cat和echo等等,还包含了一些更大、更复杂的工具,例grep、find、mount以及telnet。有些人将 BusyBox 称为 Linux 工具里的瑞士***。简单的说BusyBox就好像是个大工具箱,它集成压缩了 Linux 的许多工具和命令,也包含了 Android 系统的自带的shell
其实,本质上就是给busybox程序创建软链接,就能根据其软链接名来调用对应软链接名的命令,如创建软链接ls -->busybox,就能使用软链接名ls来正常使用ls命令。
(1)安装依赖包
# yum install glibc-static
(2)下载、解压busybox-1.22.1.tar.bz2
# tar xf busybox-1.22.1.tar.bz2
(3)编译安装busybox-1.22.1
# cd busybox-1.22.1
# make menuconfig
选定为静态编译
(busybox没有bash,而是ash ,但是兼容bash)
编译安装busybox
[root@localhost busybox-1.22.1]# make
[root@localhost busybox-1.22.1]# make install
[root@localhost busybox-1.22.1]# cd _install  #默认安装在当前目录的_install目录下
[root@localhost _install]# ls
bin  linuxrc  sbin  usr
2、复制_install目录下的所有文件到目标机根目录下
[root@localhost sysroot]# ls
bin  etc  homelib64   media  mnt  proc  root  sbin  sys  tmp  usrvar
[root@localhost sysroot]# rm * -rf  #清空sysroot目录下的所有文件
[root@localhost _install]# cp -a * /mnt/sysroot
[root@localhost sysroot]# ls
bin  linuxrc  sbin  usr
[root@localhost sysroot]# rm linuxrc  #linuxrc链接没用,可删除
rm: remove symbolic link `linuxrc‘? y
3、为目标机的sbin/init提供配置文件 /mnt/sysroot/etc/inittab
只提供物理控制台的inittab:
[root@localhost sysroot]# vim etc/inittab
::sysinit:/etc/rc.d/rc.sysinit
console::respawn:-/bin/sh  (“-”表示该shell为 login shell。)
::ctrlaltdel:/sbin/reboot
::shutdown:/bin/umount -a -r
4、提供系统初始化脚本
[root@localhost rc.d]# vim rc.sysinit  #在etc/rc.d/目录中提供系统初始化脚本
#!/bin/sh
#
echo -e "Welcome to \033[43mCustomed\033[0m Linux"
echo "Remounting root filesystem"
mount -n -o remount,rw /dev/sda2 /   #以读写的方式重新挂载根文件系统
[root@localhost rc.d]# chmod +x rc.sysinit  #给予该脚本执行权限
5、提供挂载文件fstab
[root@localhost sysroot]# vim etc/fstab  #提供挂载文件fstab
/dev/sda2   /       ext4    defaults        0 0
/dev/sda1   /boot   ext4    defaults        0 0
proc        /proc   proc    defaults        0 0
sysfs       /sys    sysfs   defaults        0 0
6、再次测试目标机系统是否能正常启动
7、进一步为目标机提供用户登录界面
为目标机提供用户登录界面的inittab
::sysinit:/etc/rc.d/rc.sysinit
::respawn:/sbin/getty 19200 tty1
::respawn:/sbin/getty 19200 tty2
::respawn:/sbin/getty 19200 tty3
::respawn:/sbin/getty 19200 tty4
::respawn:/sbin/getty 19200 tty5
::respawn:/sbin/getty 19200 tty6
::ctrlaltdel:/sbin/reboot
::shutdown:/bin/umount -a -r
测试:
(已有登录界面了)
8、为目标机提供用户和账号(能验证用户登录)
(1)使用openssl加密密码
[root@localhost sysroot]# openssl passwd -1 -salt `openssl rand -hex 4`
Password:
$1$f73e29d0$r.BamU/sKlQH9TmbT4j.e1
(2)提供/etc/passwd文件
root:x:0:0::/root:/bin/sh   #busybox提供了sh,但没有提供bash
hjq:x:500:500::/home/hjq:/bin/sh
(3)提供对应的/etc/shadow文件
root:$1$f73e29d0$r.BamU/sKlQH9TmbT4j.e1:16250:0:99999:7:::
hjq:$1$f73e29d0$r.BamU/sKlQH9TmbT4j.e1:16250:0:99999:7:::
[root@localhost etc]# chmod go= shadow  #修改shadow文件的权限,只有管理员才有权限
[root@localhost etc]# ll shadow
-rw------- 1 root root  117 Aug 20 18:27 shadow
(4)提供/etc/group文件
root:x:0:
hjq:x:500
(5)为hjq用户创建家目录
[root@localhost sysroot]# mkdir /home/hjq
(6)提供命令行提示符
[root@localhost sysroot]# vim etc/profile
export PS1=‘[\u@\h \W]\$‘  (注意:这里要用单引号,不能用双引号)
(7)提供主机名
[root@localhost sysroot]# mkdir etc/sysconfig
[root@localhost sysroot]# vim etc/sysconfig/network
HOSTNAME=www.hjq.com
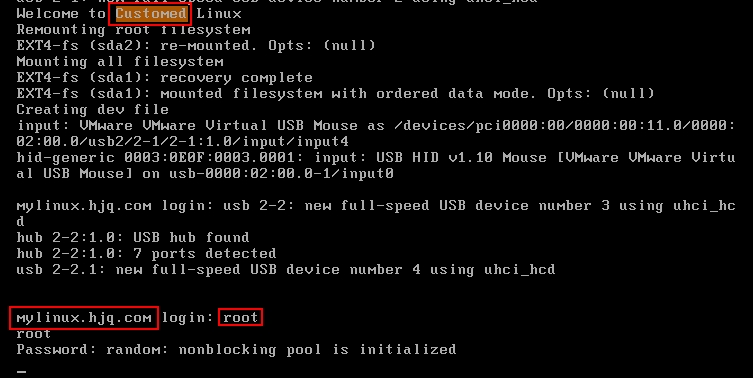
(8)重新修改系统初始化脚本
[root@localhost sysroot]# vim etc/rc.d/rc.sysinit
#!/bin/sh
echo -e "Welcome to \033[43mCustomed\033[0m Linux"
echo "Remounting root filesystem"
mount -n -o remount,rw /dev/sda2 /
echo "Mounting all filesystem"
mount -a  #自动挂载/etc/fstab文件中定义的设备
echo "Creating dev file"
mdev -s
[ -f /etc/sysconfig/network ] && source /etc/sysconfig/network
[ -z "$HOSTNAME" -o "$HOSTNAME" == "(none)" ] && hostname localhost || hostname $HOSTNAME
[root@localhost etc]# sync
遇到的问题:在宿主机和目标机之间切换得太快了,在宿主机上修改的文件还没同步到目标机上,就会出现以下这种问题。
解决方法:
只有一个解决方法,重新格式化该硬盘
(1)备份/mnt/sysroot目录下的所有文件(使用cpio命令能尽可能保证文件的权限等信息不变)
[root@localhost sysroot]# find . | cpio -o -H newc | gzip -9 > /root/sysroot.gz
4387 blocks
(2)卸载/dev/sdb2
[root@localhost ~]# umount /mnt/sysroot
umount: /mnt/sysroot: device is busy.
        (In some cases useful info about processes that use
         the device is found by lsof(8) or fuser(1))
[root@localhost ~]# fuser -km /mnt/sysroot  #中止正在此挂载点的进程
/mnt/sysroot:        45955c 45985c 45998c 46036c 46270c 46375c 46466c 46522c 46558c 46587c 46620c
[root@localhost ~]# umount /mnt/sysroot  #成功卸载
(3)重新格式化
[root@localhost ~]# mke2fs -t ext4 /dev/sdb2
(4)重新挂载
[root@localhost ~]# mount /dev/sdb2 /mnt/sysroot
[root@localhost ~]# cd /mnt/sysroot
[root@localhost sysroot]# ls  #重新格式化后,分区上的原有数据全被清除了
lost+found
(5)使用cpio命令重新恢复此前备份的文件
[root@localhost sysroot]# gunzip /root/sysroot.gz
[root@localhost sysroot]# cpio -i < /root/sysroot
4387 blocks
[root@localhost sysroot]# ls
bin  boot  dev  etc  home  lib64  lost+found  media  mnt  proc  root  sbin  sys  tmp  usr  var
(6)测试
(能显示主机名,测试成功)
到此一个小型的Linux系统的基本功能已经基本实现的。
至于提供远程连接和nginx功能,由于篇幅不够,以后再补充!
本文出自 “恒则有成” 博客,请务必保留此出处http://hjqjk.blog.51cto.com/5970897/1544888
郑重声明:本站内容如果来自互联网及其他传播媒体,其版权均属原媒体及文章作者所有。转载目的在于传递更多信息及用于网络分享,并不代表本站赞同其观点和对其真实性负责,也不构成任何其他建议。


