Linux 进程监控工具 monit
如果你已经使用Cacti Nagios 以及zabbix 等一系列监控工具来监控你的项目,但仍然达不到你想要的进程挂掉可以自动拉起并且邮件报警的功能,那么请往下看,推荐一款及其好用的进程监控软件Monit;
Monit是一款功能非常丰富的进程、文件、目录和设备的监测软件,适用于Linux/Unix平台。 它可以自动修复那些已经停止运作的程序,特使适合处理那些由于多种原因导致的软件错误,同时Monit 包含一个内嵌的 HTTP(S) Web 界面,你可以使用浏览器方便地查看 Monit 所监视的服务器;
Monit官网:http://mmonit.com/monit/
CentOS可以直接:
# yum install monit -y
注:CentOS 可能需要安装epel源才能有这个软件包;
这里就顺便讲一下怎么安装epel源:
## RHEL/CentOS 5 32-Bit ##
# wget http://download.fedoraproject.org/pub/epel/5/i386/epel-release-5-4.noarch.rpm
# rpm -ivh epel-release-5-4.noarch.rpm

## RHEL/CentOS 5 64-Bit ##
# wget http://download.fedoraproject.org/pub/epel/5/x86_64/epel-release-5-4.noarch.rpm
# rpm -ivh epel-release-5-4.noarch.rpm

RHEL/CentOS 6 32-64 Bit

## RHEL/CentOS 6 32-Bit ##
# wget http://download.fedoraproject.org/pub/epel/6/i386/epel-release-6-8.noarch.rpm
# rpm -ivh epel-release-6-8.noarch.rpm

## RHEL/CentOS 6 64-Bit ##
# wget http://download.fedoraproject.org/pub/epel/6/x86_64/epel-release-6-8.noarch.rpm
# rpm -ivh epel-release-6-8.noarch.rpm


RHEL/CentOS 7 64 Bit
## RHEL/CentOS 7 64-Bit ##
# wget http://dl.fedoraproject.org/pub/epel/beta/7/x86_64/epel-release-7-0.2.noarch.rpm
# rpm -ivh epel-release-7-0.2.noarch.rpm

# ls -1 /etc/yum.repos.d/epel*
/etc/yum.repos.d/epel.repo
/etc/yum.repos.d/epel-testing.repo

# yum repolist
# yum --enablerepo=epel info monit
# yum --enablerepo=epel install monit
Debian可以直接:
apt-get install monit -y
接下来看一下yum 装完软件包之后有哪些文件:
# rpm -ql monit
/etc/logrotate.d/monit
/etc/monit.conf
/etc/monit.d
/etc/monit.d/logging
/etc/rc.d/init.d/monit
/usr/bin/monit
/usr/share/doc/monit-5.1.1
/usr/share/doc/monit-5.1.1/CHANGES.txt
/usr/share/doc/monit-5.1.1/COPYING
/usr/share/doc/monit-5.1.1/LICENSE
/usr/share/doc/monit-5.1.1/PLATFORMS
/usr/share/doc/monit-5.1.1/README
/usr/share/doc/monit-5.1.1/README.DEVELOPER
/usr/share/doc/monit-5.1.1/README.SSL
/usr/share/man/man1/monit.1.gz
/var/log/monit
monit文档:
https://mmonit.com/monit/documentation/
查看默认配置文件:
# vim etc/monit.conf set daemon 120 # 默认每隔两分钟检测一次 set logfile syslog facility log_daemon #默认monit日志为syslog set idfile /var/.monit.id #设置Monit监控项目的唯一id文件位置,默认在$HOME/.monit.id set statefile /var/.monit.state #默认存储每个周期内monitorinig 状态的文件 set mailserver mail.bar.baz, # 默认的主邮件服务器 mailserver 支持格式为: SET MAILSERVER <hostname|ip-address [PORT number] [USERNAME string] [PASSWORD string] [using SSLAUTO|SSLV2|SSLV3|TLSV1|TLSV11|TLSV12] [CERTMD5 checksum]>, ... [with TIMEOUT X SECONDS] [using HOSTNAME hostname] 例如: set mailserver smtp.gmail.com port 587 username "[email protected]" password "password" using tlsv1 with timeout 30 seconds set eventqueue #默认当邮件服务器不可用时使用eventqueue存储报警事件 basedir /var/monit slots 100 #限制队列大小 set mail-format { from: [email protected] reply-to: [email protected] subject: $SERVICE $EVENT at $DATE message: Monit $ACTION $SERVICE at $DATE on $HOST: $DESCRIPTION. Yours sincerely, monit } set alert [email protected] # receive all alerts set httpd port 2812 and # 引用monit自己封装的web server来监控monit的监控项目状态; use address localhost # only accept connection from localhost allow localhost # allow localhost to connect to the server and allow admin:monit # require user ‘admin‘ with password ‘monit‘ allow @monit # allow users of group ‘monit‘ to connect (rw) allow @users readonly # allow users of group ‘users‘ to connect readonly include /etc/monit.d/*
看完这些是不是已经对配置文件有所了解了呢,小编为刚刚接触的同学准备了调优后的一个实例配置文件如下:
# vim etc/monit.conf set daemon 15 # check services at 2-minute intervals set logfile /var/log/monit.log set idfile /var/.monit.id set statefile /var/.monit.state set mailserver mail.wz.com username "[email protected]" password "cacti" with timeout 15 seconds set eventqueue basedir /var/monit # set the base directory where events will be stored slots 100 # optionally limit the queue size set mail-format { from: [email protected] subject: Monit Alert -- Host $HOST ‘s $SERVICE $DESCRIPTION message: Date: $DATE Action: $ACTION Host: $HOST Description: Host $HOST ‘s $SERVICE $DESCRIPTION $EVENT Service $SERVICE $DESCRIPTION } set alert [email protected] # receive all alerts set httpd port 11111 and allow localhost allow 192.168.3.0/24 allow username:password include /etc/monit.d/*
这里需要注意的是,上面配置的邮件服务server需要用到用户名密码认证,能力强的同学可以内网搭建一个邮件系统,觉得麻烦的同学可以用腾讯邮箱或者126...balabala
最后一项include /etc/monit.d/* 是定义监控项目配置文件放置的位置;我们需要监控哪些项目其配置文件就可以放在这里;
那小编又为同学们准备了一个实例:
# vim /etc/monit.d/perl-fcgi.conf
check process perl-fcgi with pidfile /opt/logs/perl-fcgi.pid
        start program = "/etc/init.d/perl-fcgi start"
        stop program = "/etc/init.d/perl-fcgi stop"
        if 5 restarts within 5 cycles then timeout


# vim /etc/monit.d/nginx.conf
check process nginx with pidfile /opt/logs/nginx.pid
        start program = "/etc/init.d/nginx start"
        stop program = "/etc/init.d/nginx stop"
        if failed port 80 protocol http then restart
        if 5 restarts within 5 cycles then timeout

# vim /etc/monit.d/mysql.conf
check process mysqld with pidfile /data/mariadb/mariadb.pid
        start program = "/etc/init.d/mysqld start"
        stop program = "/etc/init.d/mysqld stop"
        #if failed port 3306 protocol mysql then restart
        if failed unixsocket /tmp/mysql.sock then restart
        if 5 restarts within 5 cycles then timeout
配置文件有了,接下来检测一下语法对不对呢:
# monit -t
Control file syntax OK
启动monit:
/etc/init.d/monit start
Starting monit: monit: generated unique Monit id 5d83a4c163d9bc0218b77f1aae3cdf2d and stored to ‘/var/.monit.id‘
                                                           [  OK  ]
注意:
如果你的系统里有防火墙,这里需要添加防火墙规则;
monit的配置文件中有一个自带的web server用来监控monit里面的监控项目的状态,有个默认端口2812,如果没修改的话就添加2812端口的规则,如果修改了就添加你修改后的端口防火墙规则;
monit默认2812端口规则:
# vim /etc/sysconfig/iptables
-A INPUT -p tcp  --dport 2812 -j ACCEPT
monit修改后端口11111规则:
# vim /etc/sysconfig/iptables
-A INPUT -p tcp  --dport 11111 -j ACCEPT
记得重启iptables:
/etc/init.d/iptables restart
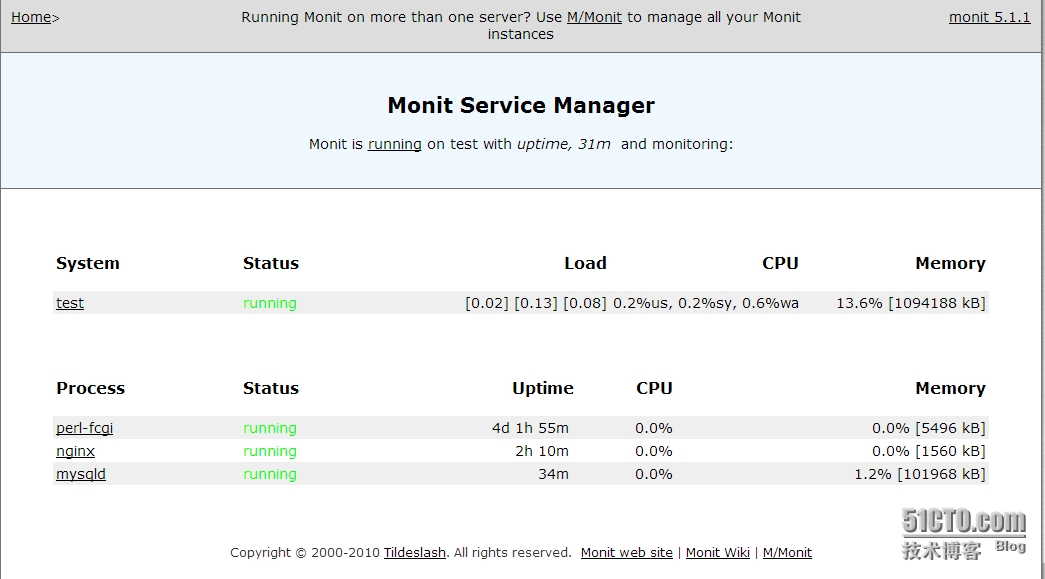
接下来在浏览器里测试访问monit的状态:
http://192.168.3.5:11111/
输入配置文件中的账号和密码:username password
尽情enjoy吧!
这里附上几张邮件报警的截图:
测试nginx关闭之后是否可以自动拉起呢?
/etc/init.d/nginx stop
马上就是见证奇迹的时刻!
看,快看!
由邮件时间看出,检测时间并且拉起进程非常快,10秒之内就检测到然后进程就又被重新拉起!
是不是非常好用呢?同学们快用起来!
本文出自 “林纳斯 托瓦兹” 博客,请务必保留此出处http://wz102.blog.51cto.com/3588520/1541567
郑重声明:本站内容如果来自互联网及其他传播媒体,其版权均属原媒体及文章作者所有。转载目的在于传递更多信息及用于网络分享,并不代表本站赞同其观点和对其真实性负责,也不构成任何其他建议。


